
Lieve allemaal,
Vanaf vandaag vind je mijn nieuwe website op: www.liefsvansuus.com!
Dear all,
From now on, you will find my new website at: www.liefsvansuus.com!
Lieve allemaal,
Vanaf vandaag vind je mijn nieuwe website op: www.liefsvansuus.com!
Dear all,
From now on, you will find my new website at: www.liefsvansuus.com!

Afgelopen week zat Helga van Leur bij De Slimste Mens en zij voorspelde dat we dit jaar een Elfstedentocht gaan krijgen. Niet omdat ze verwacht dat het écht zo hard en zo lang gaat vriezen, maar meer omdat het zo ironisch zou zijn. In deze rare Corona-tijd, zul je net zien dat wanneer alle evenementen afgelast zijn, de Elfstedentocht ineens wél door zou kunnen gaan.
This week, one of our national weather reporters predicted that this winter, we might have weather cold enough to hold our biggest open air speed skating competition. The last time this race was organised, was in 1998. It hasn’t been cold enough since then. This lady didn’t actually think it would be freezing enough this winter (global warming and all that), but she thought it would be the greatest irony; in the midst of the Covid pandemic, now all events have been cancelled, it might just be cold enough to hold that race everyone has been looking forward to for 23 years.
Of die Elfstedentocht nu ooit nog doorgaat of niet, doet er wat mij betreft niet echt toe. Ik ben de slechtste schaatster die Nederland ooit heeft voortgebracht. Maar lekker koud is het buiten wél! En daar hoort natuurlijk een heerlijke sjaal bij!
Whether this skating competition will ever take place or not, is of no real importance to me. I’m the worst ice skater Holland has ever produced. However, the weather is lovely crisp and cold! And that means; time for scarfs!

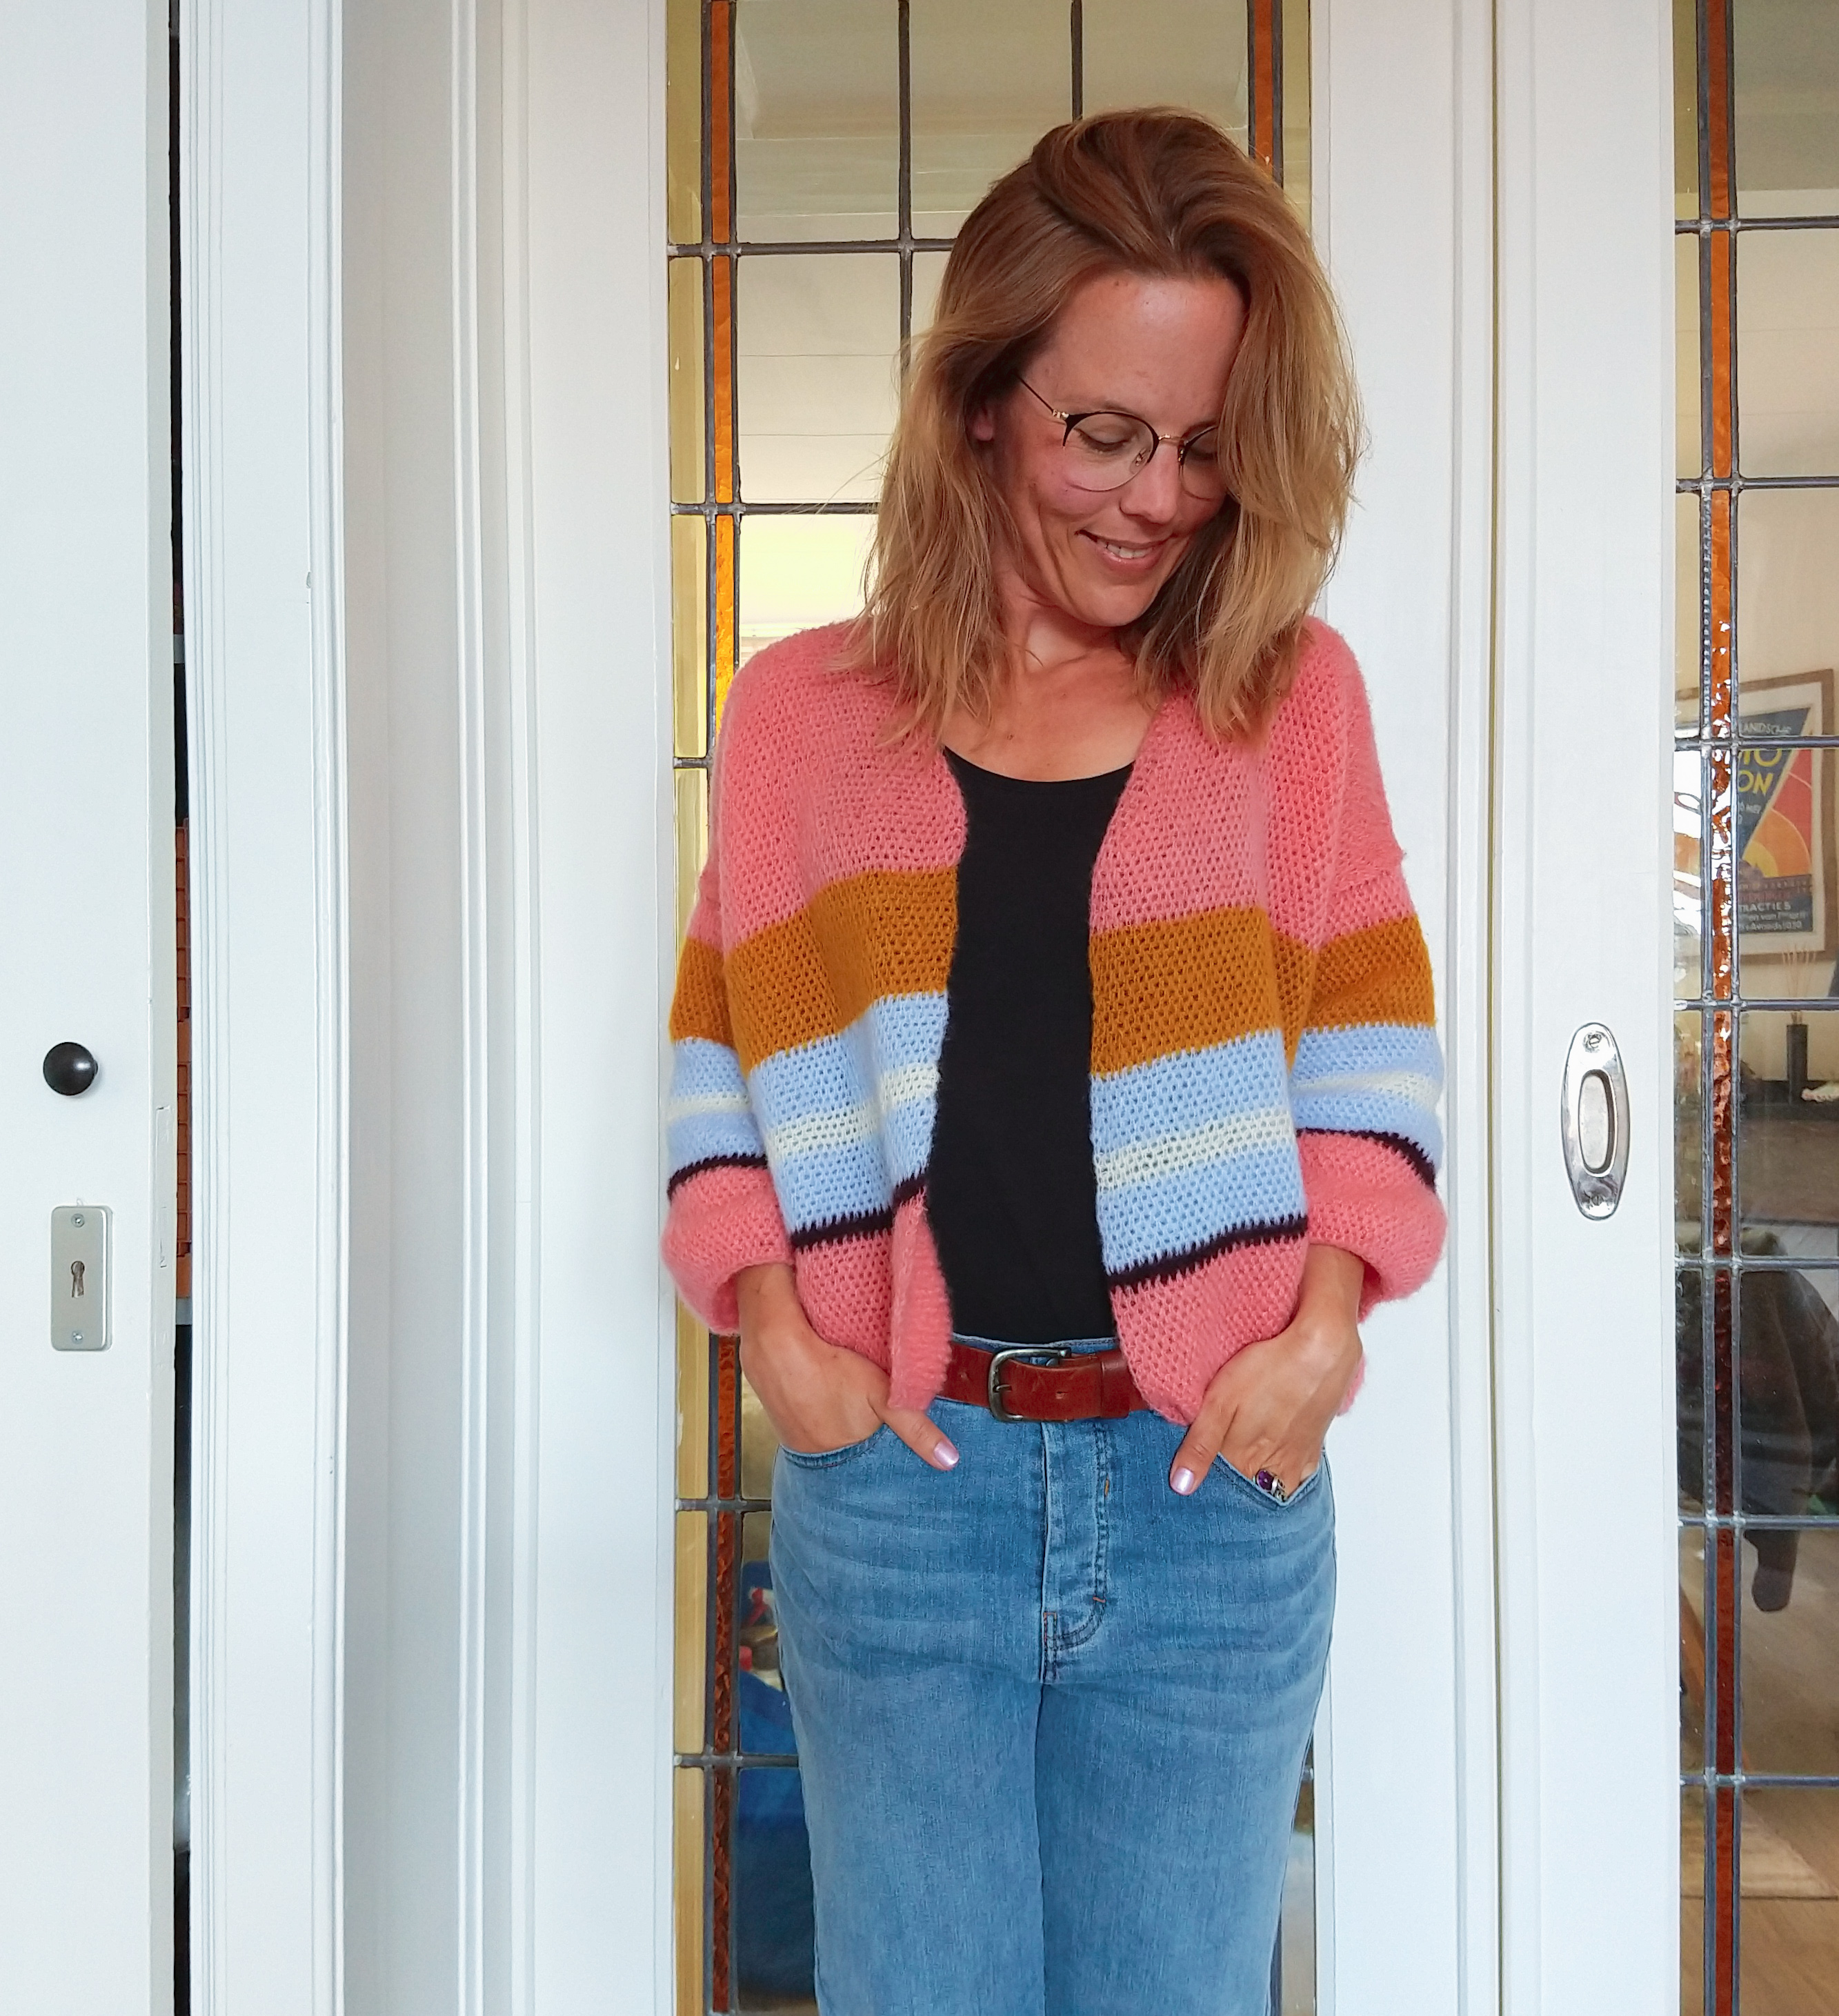
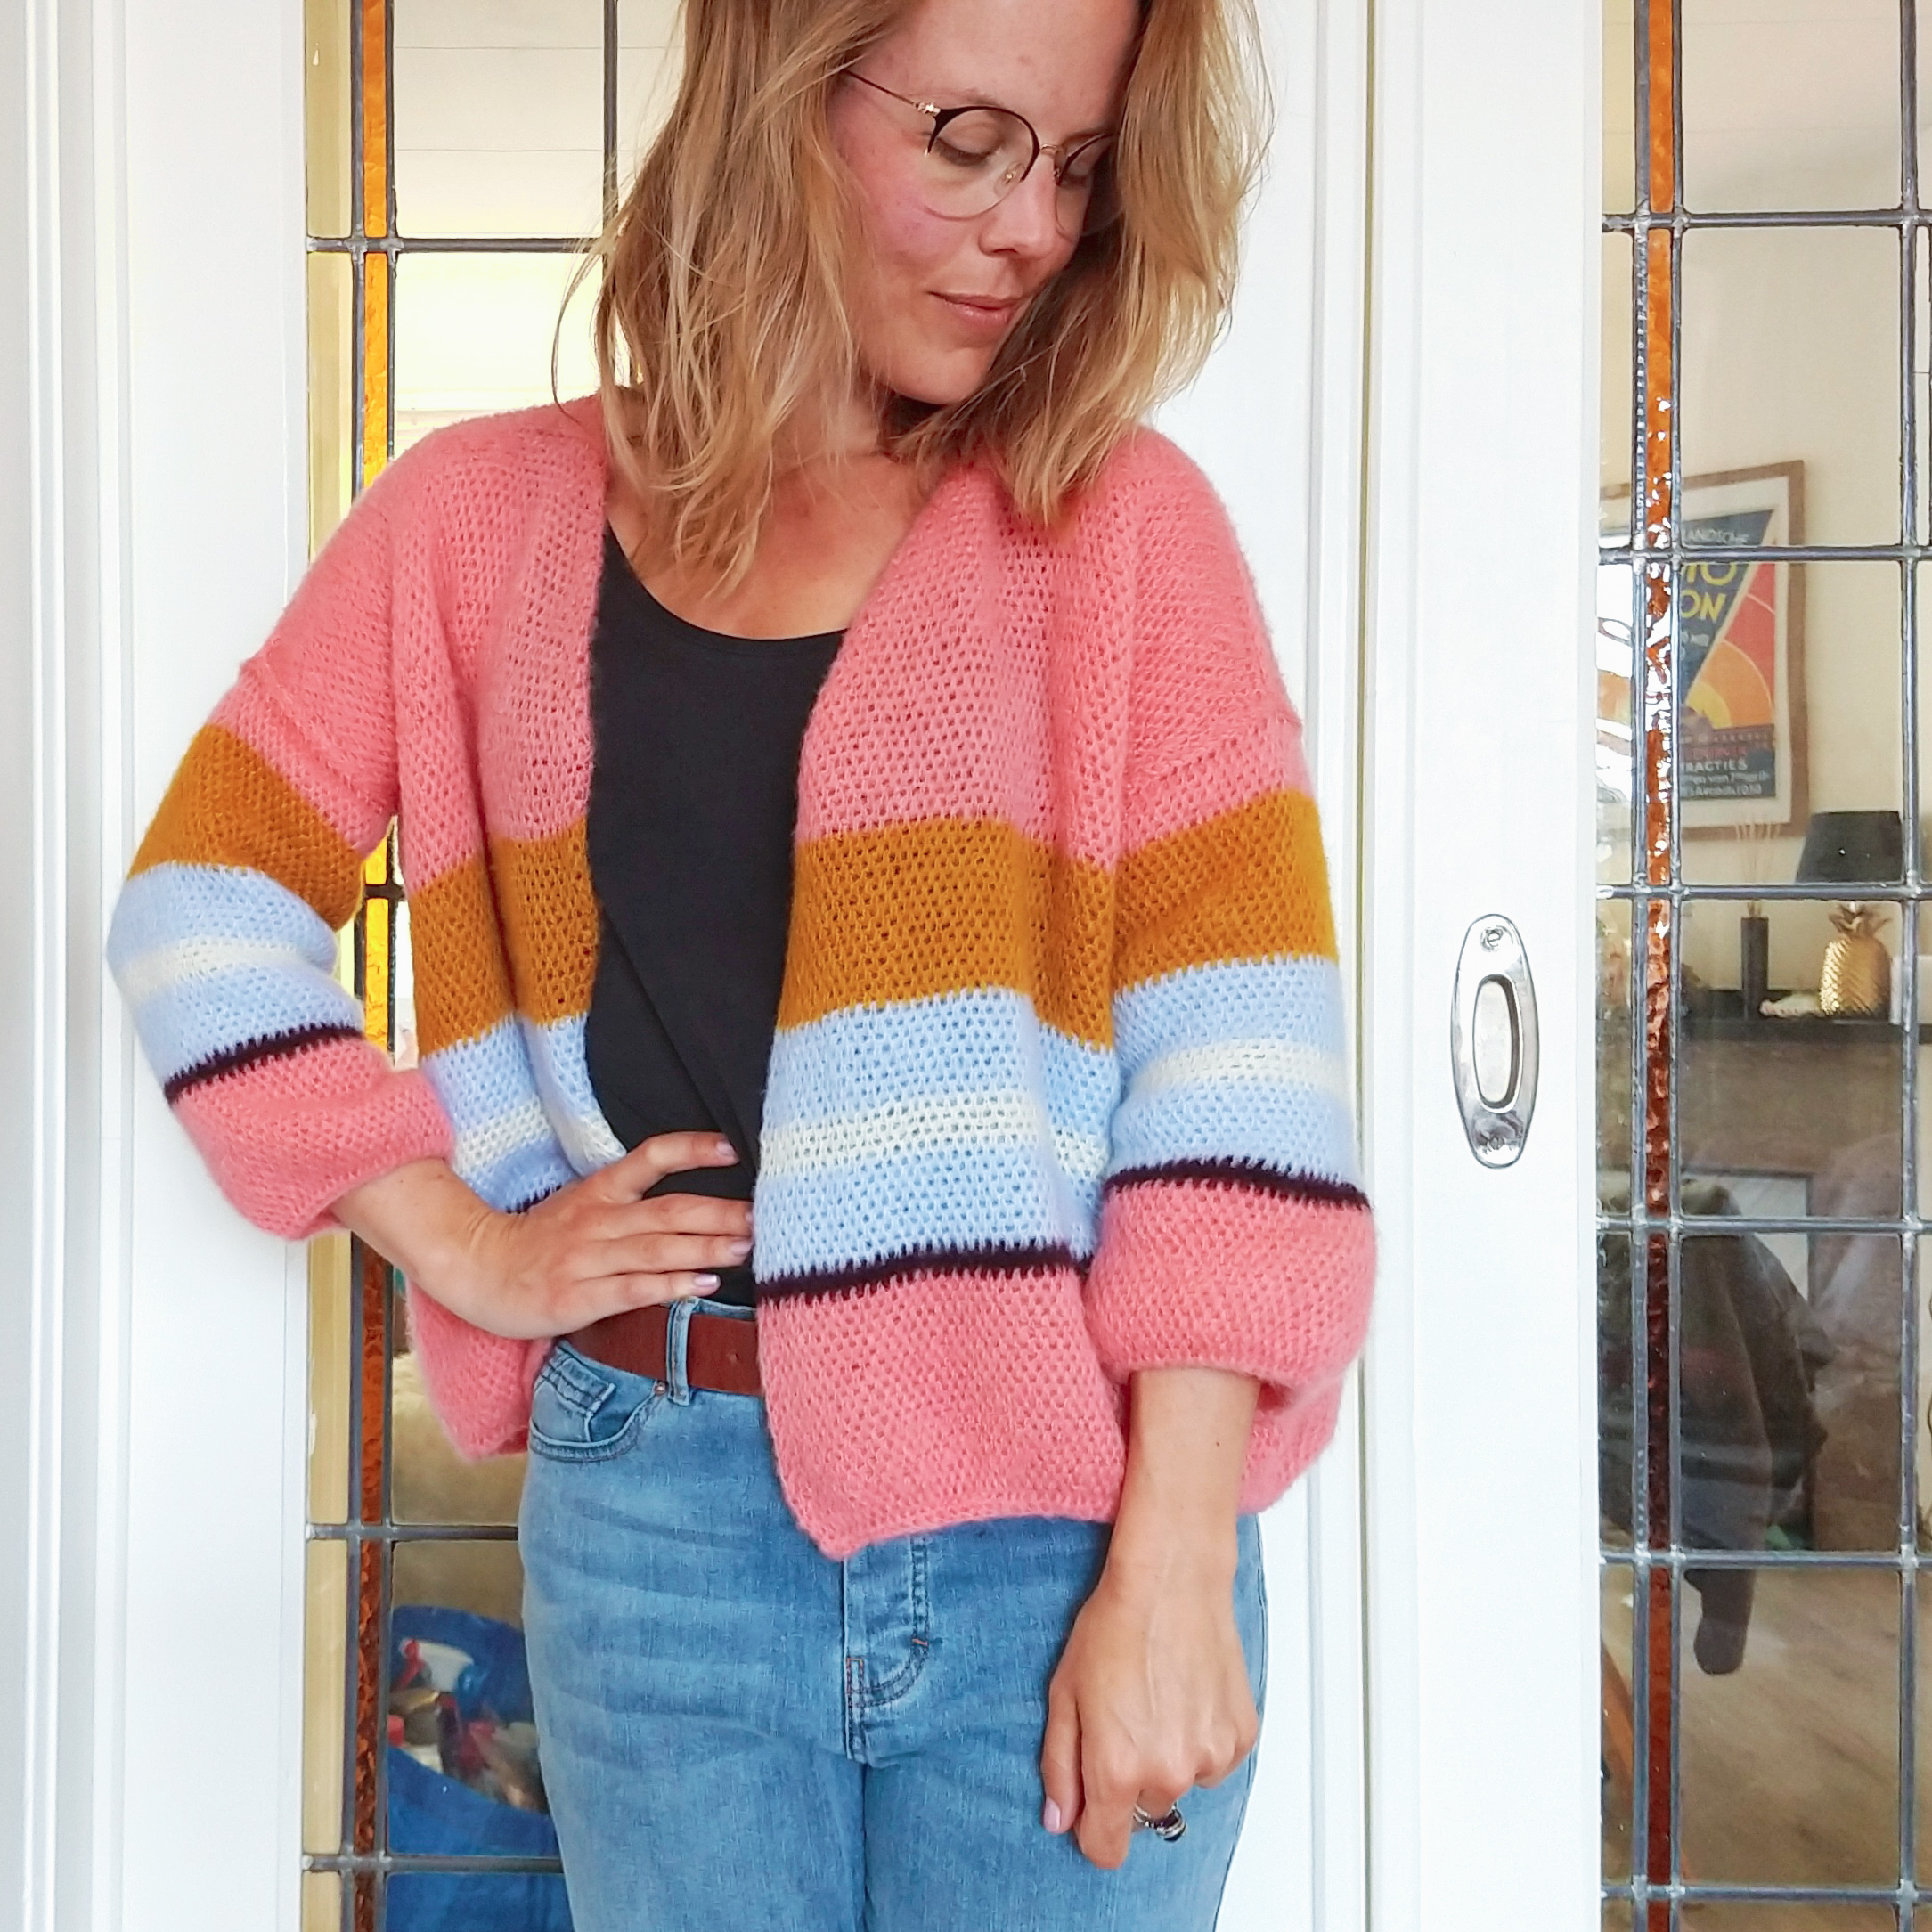
Ik heb de ongelooflijke luxepositie dat ik soms prachtige nieuwe garens uit mag kiezen bij Katia Yarns. Ook deze winter hadden ze weer ongelooflijk mooie nieuwe bollen in hun assortiment. Toen ik het Katia Concept Edén garen zag, wist ik meteen dat ik daarmee aan de slag móest! Het is namelijk het beste, zachte, pluizige garen dat ik in lange tijd had gezien! De binnenkant heeft een zacht kleurtje dat heel langzaam verloopt en daar omheen zit een heerlijke zwarte pluis. Knuffelgaren. Niets meer, niets minder.
I’m an incredibly lucky bastard that I once in a while get to pick gorgeous new yarn at Katia Yarns. This winter too, they had some wonderful new yarn in their range. When I spotted the Katia Concept Edén, I just knew I had to design something with that. It is the single most soft, fuzzy, best yarn that I had put my hands on in a while. The core of the thread is a soft, understated tone that changes between to shades and that tranquilness is wrapped in soft, black fluff. It’s cuddle yarn. Nothing more, nothing less.

En dus ging ik aan de slag. Een fijne, rechte sjaal moest het worden. Eentje om in te wonen deze winter. Royaal. Ik wilde ook dat het patroon voor iedereen te doen was. En waar ik persoonlijk ook groot fan van ben; een beetje snel te haken. Edén zorgt daar zelf gelukkig al voor, want het garen is geschikt voor naald 6 (ik haak strak, dus ik gebruikte naald 7). Lekker grote stappen, snel thuis! Wat is er fijner dan dat? 😉
That’s how I started working. I wanted to make a nice, straight scarf. A lovely big one, to live in during winter. I wanted the pattern to be simple, yet beautiful. One that could be followed by early crocheters as well. And, my personal favourite feat; one that would work up fairly quickly. Thankfully, Edén takes care of that already. The yarn is suitable for hooksizes 6 / US K, so before you know it, a scarf will come rolling of your hooks! What’s better than that? 😉

Voor deze sjaal gebruikte ik 9 bollen Katia Concept Edén. De sjaal is hierdoor zo lang, dat ik hem 2 keer om mijn nek kan wikkelen. Ik had ook nog garen over om kwastjes aan het uiteinde van mijn sjaal te maken. Wil je een minder royale sjaal? Dan volstaan 6 of 7 bollen ook. Scroll door naar beneden voor het gratis patroon!
For this scarf, I used 9 skeins of Katia Concept Edén. This way, I am able to wrap the scarf around my neck twice and I was left with enough yarn to add two large tassels. Would you like a smaller scarf that only wraps around once? You should have enough using 6 or 7 skeins. Scroll all the way down for the free English (US terms) pattern!

Gebruik voor deze sjaal haaknaald 6 of als je strak haakt zoals ik (of je steken sowieso wat soepeler wilt) haaknaald 7.
Afkortingen
l = losse
kl = keerlosse
stk = stokje
sh = samen haken
Meerderen

Recht

Minderen


For this scarf, use hook 6 / K or, if you’re a tight crocheter like me, hook 7.
Abbreviations
ch = chain
cc = double crochet
tog = together
Increasing
Straight up
Decreasing

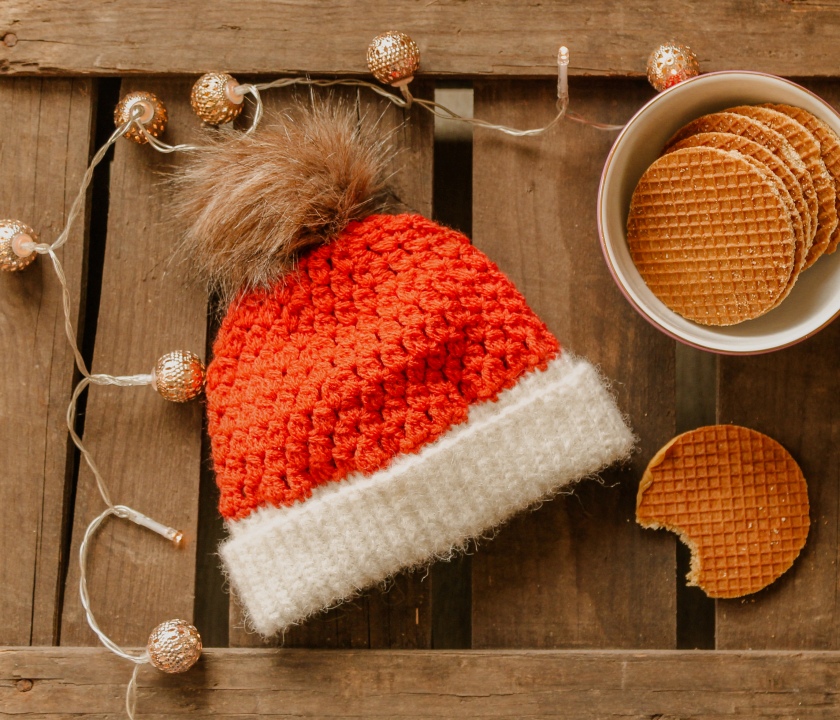
Niet zo lang geleden publiceerde ik het patroon van de Elin Beanie, de Grote Mensen variant van de Elin Baby Beanie. Nu weet ik ook wel dat het een superleuk idee is om zowel mama als baby eenzelfde muts cadeau te geven (of jezelf en je kleintje te verwennen met een matching set, natuurlijk). En de baby versie had ik in een ander soort garen ontworpen dan de grote versie. Probleem! Maar daar is nu gelukkig een oplossing voor: de Elin Baby Beanie DK.
Not that long ago, I published the pattern to the Elin Beanie, the Grown-Up version of the Elin Baby Beanie. Of course, I know that the idea of surprising a mommy (to be) with a similar beanie as her baby (or treating yourself and your little one to a matching set) is the absoluut BOMB. And I was aware that the baby version was designed in a thinner yarn than the adult version. Problem! But thankfully, I have found a solution: the Elin Baby Beanie DK.

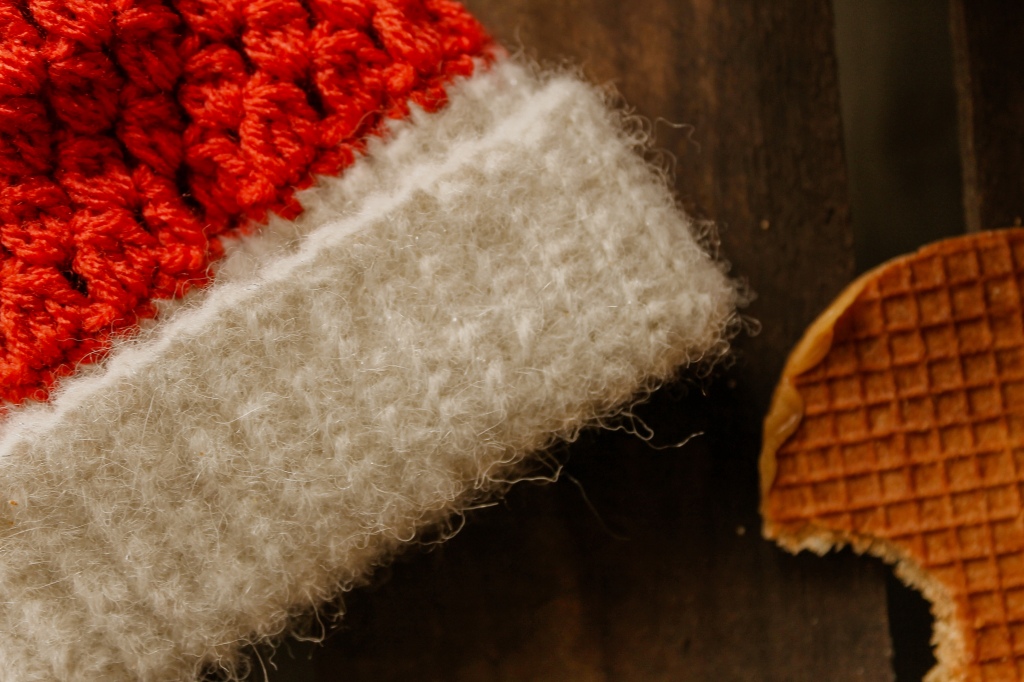
Dus hier gaan we weer. Pak je DK garen (ik gebruikte Katia Concept Silver Alpaca voor de boord en Scheepjes Colour Crafter voor de body van de muts, maar je kunt de muts heel gemakkelijk alleen maar in Scheepjes Colour Crafter of vergelijkbaar garen maken) erbij, pak je haaknaalden 3mm en 4mm erbij en je kunt aan de slag!
So here we go again! Get your DK yarn (I used Katia Concept Silver Alpaca for the brim and Scheepjes Colour Crafter for the body of the beanie, but you can easily use only Scheepjes Colour Crafter or similar yarn for the entire hat) and your 3mm and 4mm crochet hooks and off we go!

Dit patroon komt in meerdere maten. Volg de kleurtjes om jouw juiste maat te vinden: 3-6 maanden, 6-18 maanden, peuter.
Benodigdheden
– 1 bol Scheepjes Colour Crafter (of vergelijkbaar) naar keuze, of 2 voor een contrastkleur in de rand.
– haaknaald 3 mm
– haaknaald 4 mm
– schaar
– stopnaald
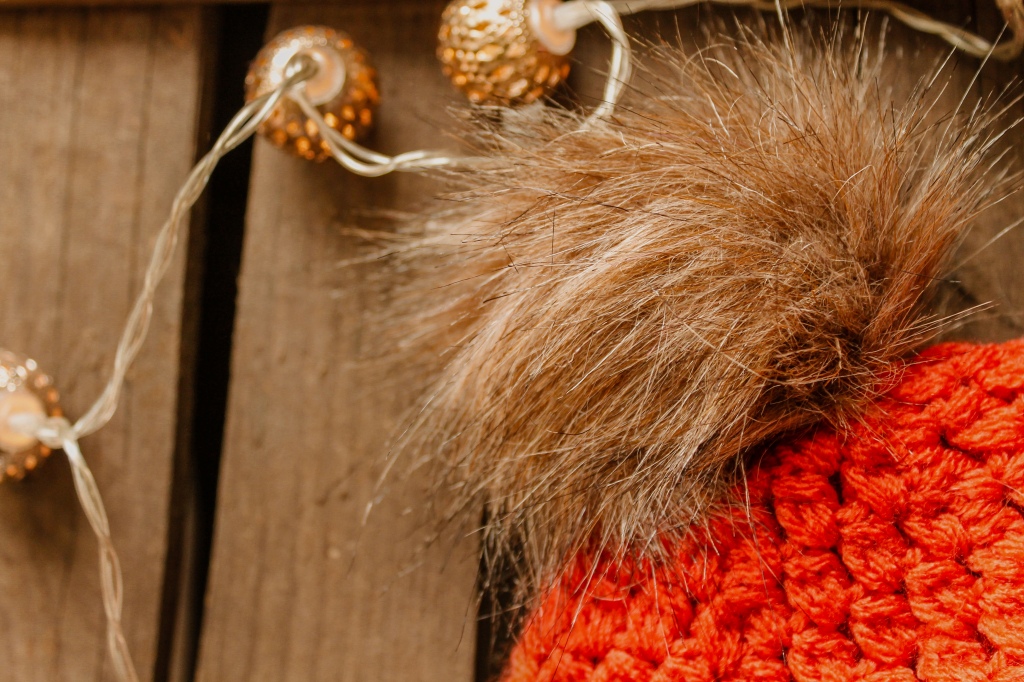
– eventueel een faux-fur pompon
Afkortingen
– st = steek
– l = losse
– hv = halve vaste
– v = vaste
– val = vaste enkel in de achterste lus gehaakt
– stk = stokje
– sh = samen haken
Het patroon – de boord
De body van de muts
This pattern comes in 3 sizes, follow the colour corresponding to your size of choice to get a matching beanie: 3-6 months, 6-18 months, toddler.
Materials
– 1 skein of Scheepjes Colour Crafter (or similar) of choice or 2 skeins for a contrast colour in the ribbing.
– crochet hook 3 mm
– crochet hook 4 mm
– scissors
– sewing needle
– option of a faux-fur pompom
Abbreviations
– st = stitch
– ch = chain
– slst= slip stitch
– sc = single crochet
– scblo = single crochet back loop only
– dc = double crochet
– tog = together
The pattern – the ribbing
Thee body of the beanie

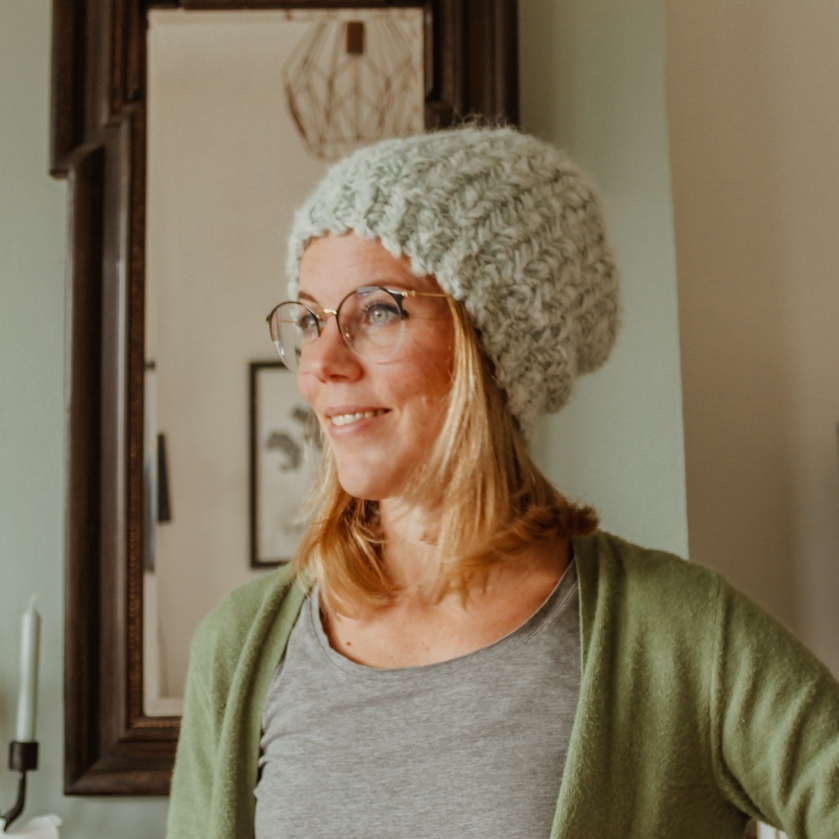
Toen ik vorig jaar de Elin Baby Beanie haakte, was dit niet de eerste keer dat ik zo’n model muts probeerde te maken. Een jaar eerder had ik namelijk al zo’n gezellig modelletje in het groot gehaakt voor een goede vriendin van me. Ik schreef hier echter geen patroon van. Natuurlijk niet. Ik was toen nog in de veronderstelling dat niemand écht op patronen van mij zat te wachten. Een fotootje plaatste ik wel, maar dan bij de tutorial voor de faux-fur pompon.
When I published the pattern for the Elin Baby Beanie, it wasn’t the first (or second) time I made that sort of beanie. A year before, I published the same kind of cosy beanie in an adult size for a close friend. However, I never wrote down a pattern. Of course not. Back then, I was still living under the misapprehention that nobody really needed a pattern from me. I did upload a picture of said beanie, but it never made it further than the tutorial for the faux-fur pompom.

Maar steeds vaker kreeg ik de vraag of ik ook een patroon voor de volwassen maat wilde schrijven. En toen de muts van die vriendin door een ietwat onhandig ongeluk kapotging, had ik een goede reden om er écht aan te beginnen; het patroon van de Grote Mensen Elin. De Elin Beanie.
More and more I was asked if there would be a pattern for the adult size beanie. And when the hat of my friend got demolished in a little accident, I finally had a reason to get to it; the pattern for the Big Elin. The Elin Beanie.

Ik besloot deze keer niet in Baby Merino te werken, maar in DK acryl garen. Dit is iets dikker dan de baby variant van de Elin Beanie. Zeer binnenkort zal ik dan ook een update posten voor de Elin Baby Beanie in DK garen, zodat je zowel de grote als de baby versie in dezelfde wol kunt haken en écht kunt twinnen met je kleintje. Of natuurlijk een (aanstaande) moeder blij kunt maken met een setje. Ik gebruikte voor deze beanie Scheepjes Colour Crafter; heerlijk zachte acryl met anti-pilling behandeling, dus je hebt er extra lang plezier van!
For this bigger beanie, I decided not to work with Baby Merino, but with DK acrylic yarn. This is slightly bigger than the yarn I used for the baby beanie, so I’ve decided that very soon, I will post the Elin Baby Beanie in DK yarn as well. This way, you get to make the Big as the Baby Beanie in the same yarn, so you really can twin with your little one! Or, make a pretty set for a mommy (to be). I used Scheepjes Colour Crafter for this beanie; wonderfully soft yarn with an anti-pilling treatment, to give you an extra long lasting result of your work!

Ik heb deze volwassenen versie van de Elin Beanie geschreven voor 2 maten: kind / kleine volwassene en grote volwassene. Volg in het patroon de kleurtjes die bij jouw gewenste maat horen. Voor beide maten heb je maar 1 bol Scheepjes Colour Crafter nodig.
For this adult beanie, I worked out 2 sizes: child / small adult and big adult. In the pattern: follow the colours corresponding with your desired size. For both sizes, you’ll only need 1 skein of Scheepjes Colour Crafter. Scroll down the page to find the English pattern (US terms)
Benodigdheden
– 1 bol Scheepjes Colour Crafter (of vergelijkbaar) naar keuze.
– haaknaald 3 mm
– haaknaald 4 mm
– schaar
– stopnaald
– eventueel een faux-fur pompon
Afkortingen
– st = steek
– l = losse
– hv = halve vaste
– v = vaste
– val = vaste enkel in de achterste lus gehaakt
– stk = stokje
– sh = samen haken
Het patroon – de boord
De body van de muts

Materials
– 1 skein of Scheepjes Colour Crafter (or similar) of choice.
– crochet hook 3 mm
– crochet hook 4 mm
– scissors
– sewing needle
– option of a faux-fur pompom
Abbreviations
– st = stitch
– ch = chain
– slst= slip stitch
– sc = single crochet
– scblo = single crochet back loop only
– dc = double crochet
– tog = together
The pattern – the ribbing
Thee body of the beanie
Heb ik wel eens gezegd dat ik in Den Haag woon? Ja hè? Worden jullie er al moe van? Ik namelijk nog lang niet! Ik ben gek op de duinen en het strand, de gezelligheid van de stad, de mooie wijken, de haven, de verse vis… En daarom heb ik besloten mijn dorp maar weer eens op de kaart te zetten. Ik haakte de visgraat vaste en dacht; wat is er nou toepasselijker dan een verwijzing naar Scheveningen gebruiken?
Did I ever mention that I live in The Hague? Did I? Are you guys getting sick of it already? Because I’m not tired of my hometown yet! I love the dunes and the beaches, the coziness of the city centre, the wonderful neighbourhoods, the port, the daily caught fish… and that’s why I decided to shine a bright light on my little town once again. I made the herringbone single crochet and knew that nothing would be more appropriate than to reference Scheveningen!

Scheveningen is het oude vissersdorp dat ooit opgeslokt is door Den Haag. Zeg tegen een rasechte Scheveninger nooit dat hij uit Den Haag komt, want dan heb je ruzie. Maar ik als import-Hagenees vind het een feestje om op de fiets dit dorp te bezoeken. En bij een bezoekje hoort natuurlijk ook altijd een hapje verse vis!
Scheveningen is the old fishermen’s village that was once swallowed up by The Hague. Never tell a born and bred Scheveninger that he comes from The Hague, because you will quickly swim with the fish. For me, as an import resident of The Hague, I love how I can just take my bike and visit this village. And no visit is complete without a meal of fresh herring!

Dus 1 en 1 werd 2. Van Katia ontving ik heel lief het prachtige Concept Tribu garen en de combinatie van dit garen met de visgraat vaste was zo ontzettend fijn, dat er voor ik er echt erg in had, een muts uit mijn handen rolde. En wat was hij prachtig! De visgraat steek deed me denken aan Elsa, aan winter… Maar dus ook aan Scheveningen. En zo ontstond de See you at Scheveningen beanie. Een heerlijke winterse muts met een heerlijk bijzonder steekje!
So 1 and 1 equalled 2 one more time. Katia very kindly gifted me the amazing Concept Tribu yarn and combining this yarn with the herringbone single crochet ended up being such a joy, a beanie rolled out of my hands before I even knew it. And how gorgeous it was! The herringbone stitch reminded me of Elsa, of winter… But also of Scheveningen. And that’s how the See you at Scheveningen beanie came to life. A wonderfully wintery beanie in this special little stitch!

Maak je eigen See you at Scheveningen beanie met slechts 2 bollen Katia Concept Tribu (of 1 als je een kindermaatje wilt haken) en mijn nieuwste patroon!
Klik HIER om naar mijn Etsy shop te gaan (ondersteunt Ideal-betalingen)
Klik HIER om naar mijn Ravelry shop te gaan.
So make your own See you at Scheveningen beanie now with just 2 skeins of Katia Concept Tribu (or 1 if you opt for the children’s size) and my latest pattern!
Tap HERE for my Ravelry store
Tap HERE for my Etsy shop!


Al maanden – wat zeg ik? Al jaren! – ben ik verliefd op die heerlijke fluffy Bernadette vesten die ik steeds voorbij zie komen op Social Media. Prachtige gebreide vesten in luxe mohair die eruit zien alsof je een droompje draagt. Er waren alleen altijd een aantal probleempjes: 1, ik kan niet breien en 2, mohair is dúúr!
For months – I’m lying; for years! – I have been in love with those gorgeous fluffy Bernadette cardigans that I saw passing by on Social Media. Stunning knitted cardigans in luxurious mohair that look like you’re wearing a dream. However, I always encountered a few problems: 1, I can’t knit for the life of me and 2, mohair is EXPENSIVE!

Het is vaak moeilijk haken met harige garens. Je verliest snel het zicht op je steken. Het duurde daarom waarschijnlijk even tot ik het idee opvatte om het dan maar in Tunisch haken te doen. Want dat lijkt net op breien, alleen kan ik dat wel! En zo ontstond het idee om een heerlijk fluffy vest te maken voor mezelf, in heerlijk vrolijke kleuren, dat niet zo ingewikkeld was als breien en niet zo duur als mohair, maar er dan wél zo uitzag.
It can be very hard to crochet with fluffy yarn. It’s impossible to keep track of all your stitches. This might be why it took me a while to finally get to the idea of making a Tunisian crochet cardigan. But it’s a wonderful idea! It’s like knitting, but crochet (so I know how to do that). I wanted to make a wonderfully fluffy cardigan for myself, in wonderfully bright colours, that wouldn’t be as difficult to make as knitting and not as expensive as mohair. But it had to look the part, of course!

Al eerder had ik gewerkt met Phildar Phil Light. Het is een ongelooflijk zacht en luchtig synthetisch garen, dat bijna dezelfde eigenschappen heeft als mohair, maar zeker niet de prijs. Het ideale garen voor dit vest dus! Ik koos een aantal heerlijke kleurtjes, maakte een schetsje en ging aan het werk. Ik ben een slechte voorbereider; ik doe altijd maar wat.
I had worked with Phildar Phil Light before. It’s an amazingly soft and airy synthetic yarn with near to similar qualities as mohair, but definitely not the same price. The perfect yarn for this cardigan idea of mine! I chose a few yummy colours, made a rough sketch and set to work. I’m bad at preparation; I usually just start.

Wat blijkt: met de Tunische Full Stitch is dit dus een heel fijn en makkelijk vestje om te maken! En het is nóg fijner om te dragen! Het weegt bijna niets en het is zó zacht dat het voelt alsof je een wolkje draagt. De naam was dan ook snel geboren: de Casual Clouds Cardigan.
Turnes out: using the Tunisian Full Stitch this is a very enjoyable and easy cardigan to make! And it’s even better to wear! It weighs approximately nothing and it is SO soft it’s like wearing a cloud. The name was easy to find: the Casual Clouds Cardigan.

Ik heb er uiteraard een patroon van geschreven, en niet zomaar een patroon! Ik heb het patroon zo beschreven dat iedereen het kan maken. Ook en zeker als je helemaal geen ervaring hebt met tunisch haken. Ik heb de steek stap voor stap uitgeschreven. Volg mijn aanwijzingen en ook jij kunt dit vestje maken. Ja echt! Geloof me, zelfs jij!
Obviously, I turned this into a pattern and not just any old pattern! I wrote down this pattern in a way that anyone can make this cardigan. Even and especially if you don’t have any experience using Tunisian crochet at all. I wrote down this stitch step by step. Just follow my instructions and you too can make this cardigan. Yes, really! Believe me, even you!
En dan nog een speciale feature van dit patroon: het is voor iedereen volledig aan te passen aan jouw gewenste maat. Langer, wijder, korter, smaller: alles kan! Neem de omtrek van jouw heupen en meer heb je eigenlijk niet nodig! Ik heb voor mijn vestje 7 bollen Phildar Phil Light gebruikt (ik draag doorgaans maat 36 van bovenkleding). Tot en met maat M / kledingmaat 38/40 is dat wat je ongeveer nodig hebt. Iedere 2 kledingmaten groter, zou ik minimaal een bol extra aanraden. Ook de kleuren / strepen kun je helemaal naar eigen inzicht invullen, dus nog een bolletje extra is misschien sowieso een goed idee. Het is zonde om tekort te komen.
Yet another special feature of this pattern: everybody and everyone can alter it to their own size and preferences. Longer, wider, shorter, smaller: everything is possible! Just take the circumference of your hips and that is all you need! I used 7 skeins of Phildar Phil Light for my cardigan (my regular clothing size would be EU size 36 / S). Up to size M / EU size 38/40 that will be the amount of skeins you need. For every 2 sizes up, I suggest to add an extra skein. Since the colours / stripes are completely interchangable to your own likings as well, I’d suggest to add an extra skein anyway. It would be a waste to have to little.
Als laatste wil ik graag dat iedereen dit vestje kan maken. Het patroon staat daarom maar voor een klein prijsje online. Je vindt hem HIERin mijn Ravelry shop en HIERin mijn Etsy winkel.
(Let bij Ideal betalingen bij Etsy op dat je volledig doorklikt tot de betaling helemaal is afgesloten. Het gebeurt regelmatig bij Etsy dat de betaling te vroeg wordt beëindigd en je het patroon dus niet ontvangt)
Last but not least, I want this cardigan to be available for everyone. This is why you can find it for a very friendly price in my shops. Click HEREto visit my Ravelry shop and HEREfor my Etsy store.
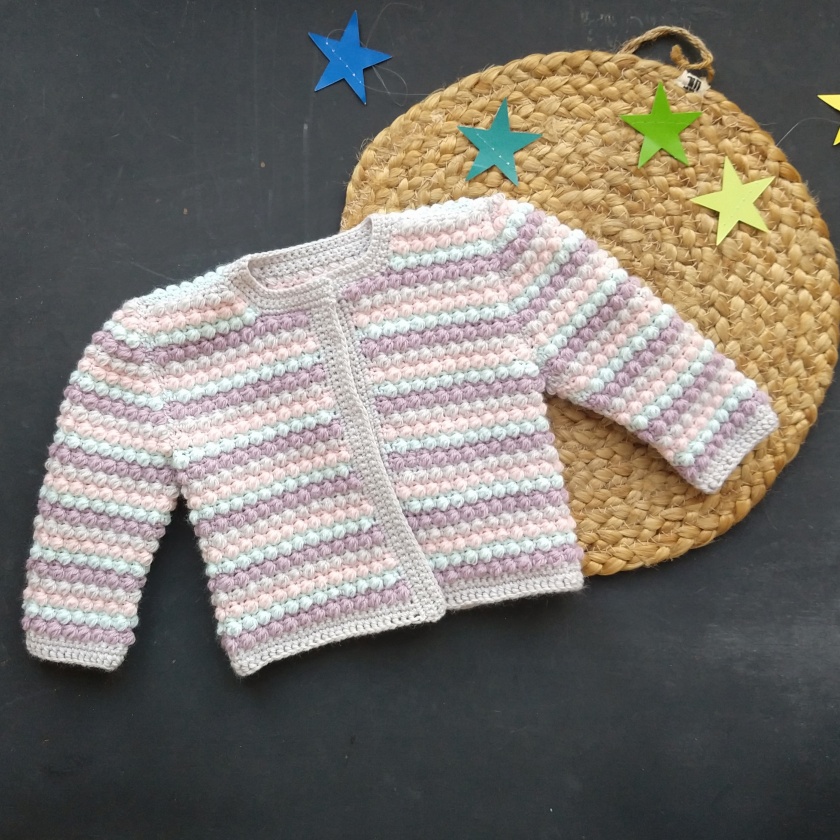
Toen ik de Petit Pebble Cardigan liet testen door een aantal geweldige dames, liet één van hen al weten dat haar dochter haar oog had laten vallen op het nieuwe vest. Dit zette de raderen bij mij aan het draaien. Eenzelfde soort vestje, maar dan voor de kleintjes onder ons; hoe ongelooflijk schattig zou dat zijn?
When I had my Petit Pebble Cardigan tested by a couple of amazing women, one of them told me her daughter was eyeballing her cardigan to take in for herself. So that put my brain into design-mode. A similar kind of cardigan, but for the tiny ladies among us: how amazingly cute would that be?

En dus bestelde ik heerlijk zachte Phildar Partner Baby in 4 idioot schattige kleurtjes en maakte een babyvestje. De kiezelsteek is nog altijd even prachtig en mooi en het past echt fantastisch bij zo’n klein maatje! Ik liet weer ieder lijntje aansluiten op het volgende, de mouwen weer aflopen, de kraag weer rondlopen… Eigenlijk al het goede van het grote vest, maar dan in het mini!
And so I ordered the wonderfully soft Phildar Partner Baby in 4 wonderfully cute colours and I made a baby cardigan. The pebble stitch once again came out gorgeously and it fits so well with this tiny size! I made sure every colour row would align to the next, that the sleeves would be fitted, the collar rounded… Pretty much all the goodness of the larger cardigan, but mini!
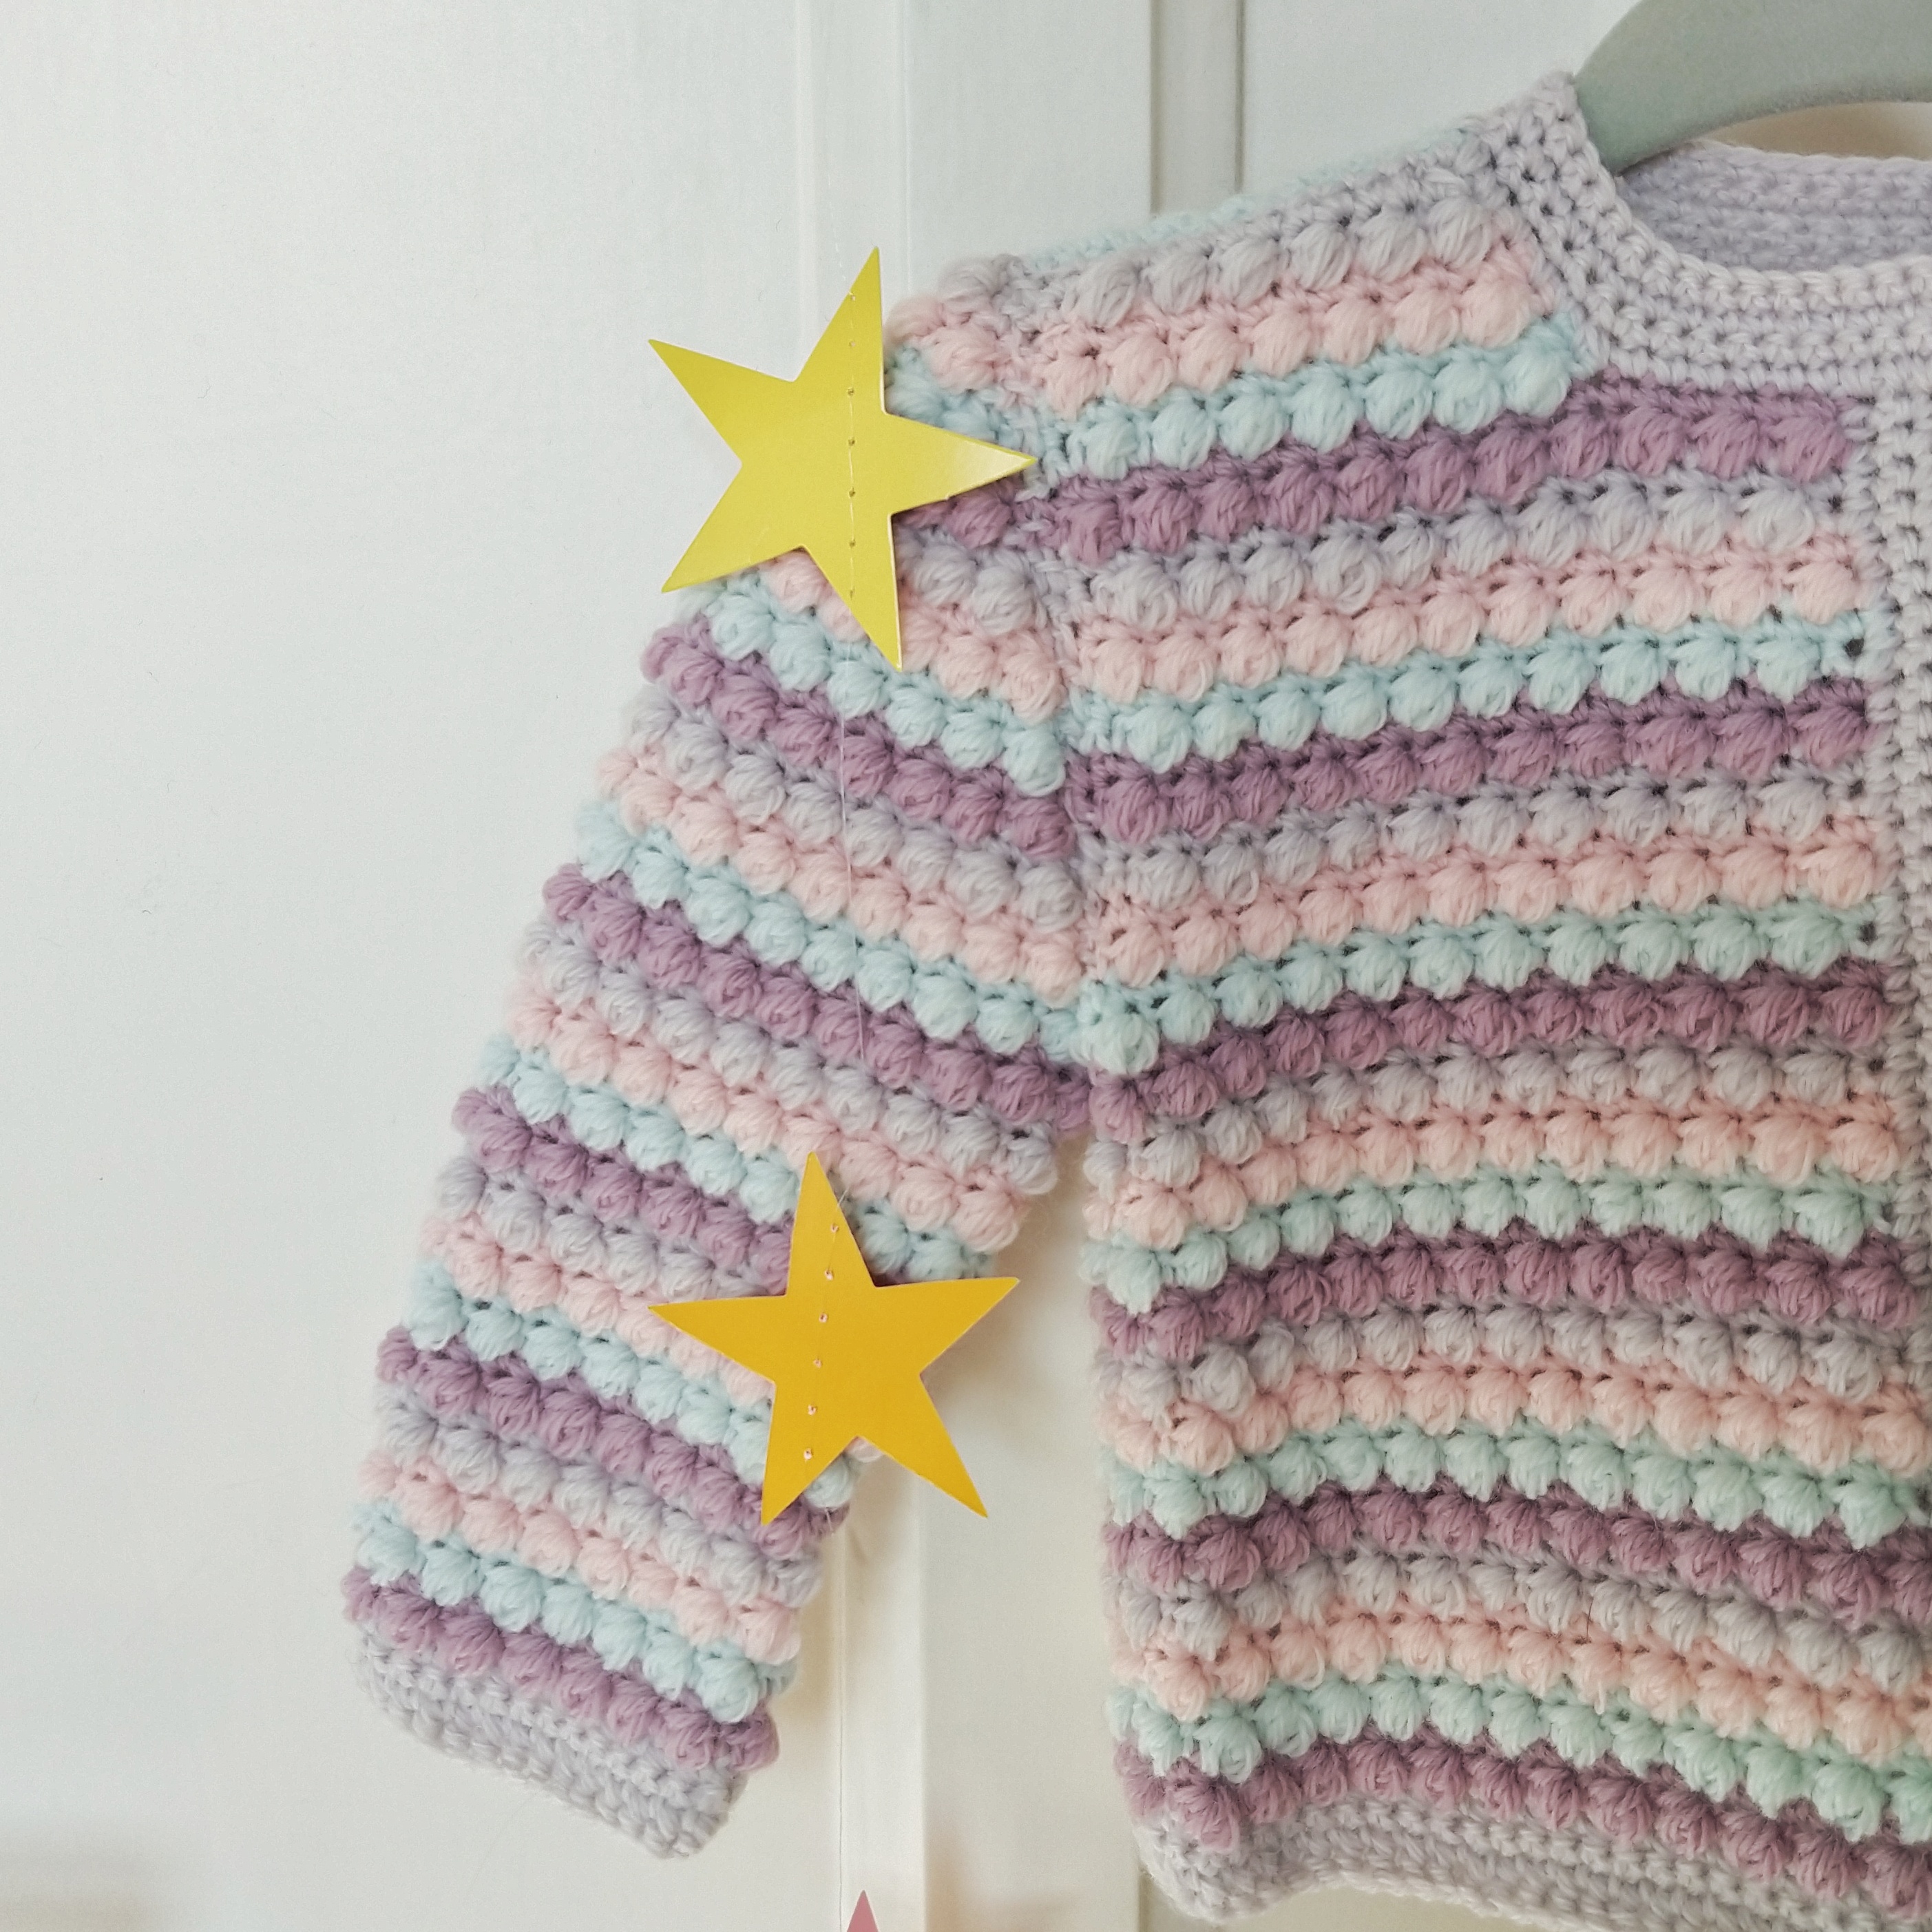
Ik heb zelf geen kinderen en dus geen gewillige slachtoffers die als paspop wilden werken voor mijn ontwerp. Gelukkig vond ik weer een groep geweldige testers die het vest in alle maatjes hebben getest die ik uitgerekend had. Want dat zijn er nogal wat! Dit kindervestje komt in maar liefst 9 maten! 4 babymaten (van 0-3 maanden tot 12-18 maanden) en 5 kindermaten (van 2 jaar tot en met 12 jaar)! Echt voor elk wat wils dus!
I do not have children myself, so while designing I lacked a willing little mannequin to try my design on. Thankfully, I found another group of amazing testers that tried my cardigan in all sizes I designed. And boy, did I calculate a lot of sizes! This cute little childrens cardigan comes in 4 baby sizes (from 0-3 months to 12-18 months) and 5 children sizes (from 2 years to 12 years)! Catering to your every need!

Twinning is winning, dus niets weerhoudt je er nu van om jouw kleine in eenzelfde soort vestje te laten lopen als je zelf al hebt! Je kunt het patroon voor zowel de Mini Pebble Cardigan als de Petit Pebble Cardigan vinden in mijn shops. Daar heb ik ook een combi-deal gemaakt van beide patronen. Kies 4 leuke kleurtjes uit, sla de handen uit de mouwen en straal in je hoogstpersoonlijke Mini & Me vesten!
Twinning is winning, and now nothing holds you back from making the same kind of cardigan for your little one and yourself! You can find the solo patterns for the Mini Pebble Cardigan and the Petit Pebble Cardigan in my shops. I have made a combination deal as well for both patterns. Find 4 lovely colours, get your hooks out and shine in your personal Mini & Me cardigans!
Het patroon in mijn Etsy shop vind je HIER
Het patroon in mijn Ravelry shop vind je HIER
De Set voor zowel de Petit Pebble Cardigan en de Mini Pebble Cardigan voor een leuke combinatieprijs, vind je HIER
For the pattern in my Etsy shop, click HERE
For the pattern in my Ravelry shop, click HERE
For the set for both the Petit Pebble Cardigan and the Mini Pebble Cardigan for a reduced price, click HERE


Kleur. Iedereen die mij al langere tijd volgt, weet dat ik gek ben op kleur. Alle sprekende kleuren van de regenboog, het liefste in heerlijke printjes, in streepjes, in bloemetjes… Het is ook een beetje hoe mijn persoonlijkheid is. Ik ben luidruchtig en aanwezig en zelfs als ik me voorneem om het eens een beetje rustig aan te doen, val ik op. En daarom was het ook voor mij een verrassing dat ik een hele lichte zilvergrijs bestelde bij Katia om een zomertrui van te maken.
Colour. Everyone following me for a while knows I adore colour. I love all vibrant shades of the rainbow and especially prefer prints, stripes, florals… To be honest, it’s just like my personality. I’m loud and present and even when I plan on being a bit more muted in company, I stand out. And this is why it even came as a big surprise to myself when I ordered a lovely light silver gray at Katia’s to make into a summer sweater.

Katia Concept Cosmopolitan is een garen dat niet volledig tot zijn recht komt op de foto. Het garen heeft een zachte, getwijnde structuur en is daardoor dik maar extreem luchtig. Het is zó zacht dat je er het liefste de hele dag mee knuffelt. Daarnaast heeft het een heel subtiel glittertje. Het ziet er zó chique uit dat zelfs de simpelste trui er een hele luxe uitstraling van krijgt.
This yarn, Katia Concept Cosmopolitan, is a wonderful yarn pictures don’t do proud. The yarn has a tubular structure which makes it bulky but extremely airy. It’s so soft you’d love to do nothing more than just cuddle it all day. Besides that, there’s a very subtle glitter all through the yarn. It looks _so_ fancy that even the most basic of sweaters will look absolutely luxurious.

De Spring in my Step Sweater ontstond toen ik bedacht dat ik een redelijk simpele trui wilde, met een ronde halslijn. De trui moest er zo eentje worden die je altijd, overal kunt dragen. Maar ja, ik zou ik niet zijn als ik er dan ook nog nét even iets spannends van zou willen maken. En zo verscheen het driehoekmotief op de rug. En voor ik er zelf erg in had, verscheen dezelfde driehoek ook op de mouwen.
The Spring in my Step Sweater came to life when I envisioned a very basic sweater with a rounded neckline. I wanted to design a sweater that you can wear anywhere, with anything (getting major Bridget Jones vibes right now, but that might just be me 😉 ) However, I am still me, so I knew I had to give it just a little bit of pazazz. And that’s how the triangle sequence appeared on the back and before I even noticed myself, the same triangle took shape on the sleeves.
Ik kan je eerlijk zeggen dat ik deze trui héél vaak aan heb. Hij is echt geworden wat ik voor ogen had; een fantastische allrounder! Ik heb het patroon voor 6 maten uitgeschreven, van maat S tot en met 3XL. En natuurlijk heb ik hem ook uitgebreid laten testen voor jullie. Mijn testers hebben echt geweldig werk geleverd. De Spring in my Steps Sweater is prachtig in ieder kleurtje. Klik de foto’s hieronder en laat je inspireren!
In all honesty I can say that I wear this sweater constantly. It has completely turned out to what I had in mind; a wonderful all-rounder! I have written the pattern for 6 different sizes; from S to 3XL. And of course I put a lot of amazing testers to work with the pattern before publishing it. They did an amazing job and showed that the Spring in my Steps Sweater is gorgeous in every colour. Click the photos to get inspired!


")

![20200430_155552[1]](https://liefsvansuusblog.files.wordpress.com/2020/05/20200430_1555521.jpg?w=206&resize=206%2C206#038;h=206&crop=1 "20200430_155552[1]")
En nu kun je dus zelf aan de slag! Vind het patroon in mijn Etsy Shop door HIER te klikken en ga naar mijn Ravelry Store door HIER te klikken.
Vind je het leuk om je voortgang en eindresultaat met mij te delen? Gebruik dan #springinmystepsweater wanneer je foto’s op Facebook op Instagram deelt en tag mij in je bericht (@liefsvansuus_ op Instagram en Liefs van Suus op Facebook) zodat ik het sowieso te zien krijg!
So now it’s time for you to start cracking! Find the pattern in my Etsy Shop by clicking HERE and go to my Ravelry Store by clicking HERE.
Would you like to share your progress and endresult with me? Use #springinmystepsweater when posting on Facebook or Instagram and tag me in your photos (@liefsvansuus_ on Instagram and Liefs van Suus on Facebook) so I can enjoy your work!
Ya tengo ese patrón también en Español!

Spanish pattern below! Patrón Español debajo!
Op Facebook en Instagram schreef ik nog dat ik niet wist wanneer ik voor het laatst een sjaal had gemaakt. Dat was natuurlijk onzin, bedacht ik me later. Deze winter nog maakte ik de heerlijke Choco & Sweaters sjaal (gratis patroon!) in een prachtige oranje roestkleur in Drops Nord. Maar sinds Corona in het land is en maart een eeuwigheid leek te duren en ook april drie jaar lijkt te beslaan, voelt die winter al een leven geleden. En dus werd het tijd voor een nieuwe sjaal. Een zomersjaal, welteverstaan!
On my socials I wrote that even though I started out making nothing else than shawls and wraps (and putting my family and friends in awkward positions giving them away left, right and centre), I couldn’t remember te last time I actually made a shawl. Which, turns out, was total nonsense. This Christmas, I absolutely did design a shawl; the Cinnamon and Sweaters shawl (free pattern!) and I still love it. I made it in a lovely rusty orange in the alpaca yarn Nord by Drops design. However, since Corona is among us and March felt like it lasted forever and April seems to be going that way as well, this winter feels like a lifetime ago. So it was time to make a new shawl. A summery shawlette, to be precise!

Om heel eerlijk te zijn werk ik eigenlijk nooit met verloopgaren of van die ‘cakes’. Ik weet eigenlijk niet waarom, want toen ik het Silk Degradé garen van Katia Concept in mijn Goodiebag vond na de yarntasting van Katia Yarns op de Kreadoe afgelopen oktober, jeukten mijn handen om er iets van te maken. Het is zulk prachtig garen! Het glanst en het voelt koel en glad en tegelijkertijd heel luxe. Ik vond wel meteen dat het echt een zomergaren was en dus besloot ik het voorlopig op te bergen in de kast.
To be honest, I never work with self-striping yarn or yarn cakes. I honestly don’t know why not, because once I found the Silk Degradé yarn of Katia Concept in my goodiebag after the yarntasting event of Katia Yarns last october, my entire body itched to make something of it. It’s such gorgeous yarn! It shimmers and it’s soft, sleek and cool, all the while maintaining it’s luxourious look. I did think it was a yarn that suited summer better, so I hid it away in my stash for better days.

De lente kwam en ook de quarantaine en in het zonnetje op het balkon of in de voortuin voelde ik het prikkelen om iets zomers te maken. En daar was de heerlijke bol Silk Degradé! Ik was eigenlijk helemaal niet van plan om zelf iets te ontwerpen. Een keer een patroontje van Pinterest leek me heerlijk makkelijk, tussen al dat ontwerpen door. Maar het bloed kruipt waar het niet gaan kan en toen ik een beetje bezig ging met een voorbeeldfoto, werd ik na vier toeren al kriegel en wilde ik er duizend dingen aan veranderen! En dat heb ik dus gedaan.
Spring came and so did quarantine and in the sun on my balcony or the front yard I felt the spring vibes tickle me to make something for summer. And hidden away inside my stash was the big cake of Silk Degradé! To tell you the truth, I wasn’t planning on designing something this time. I just wanted something nice and easy from Pinterest to do the job. But four rows in, everything inside of me screamed to change a hundred things about the picture I was working with. So I did.
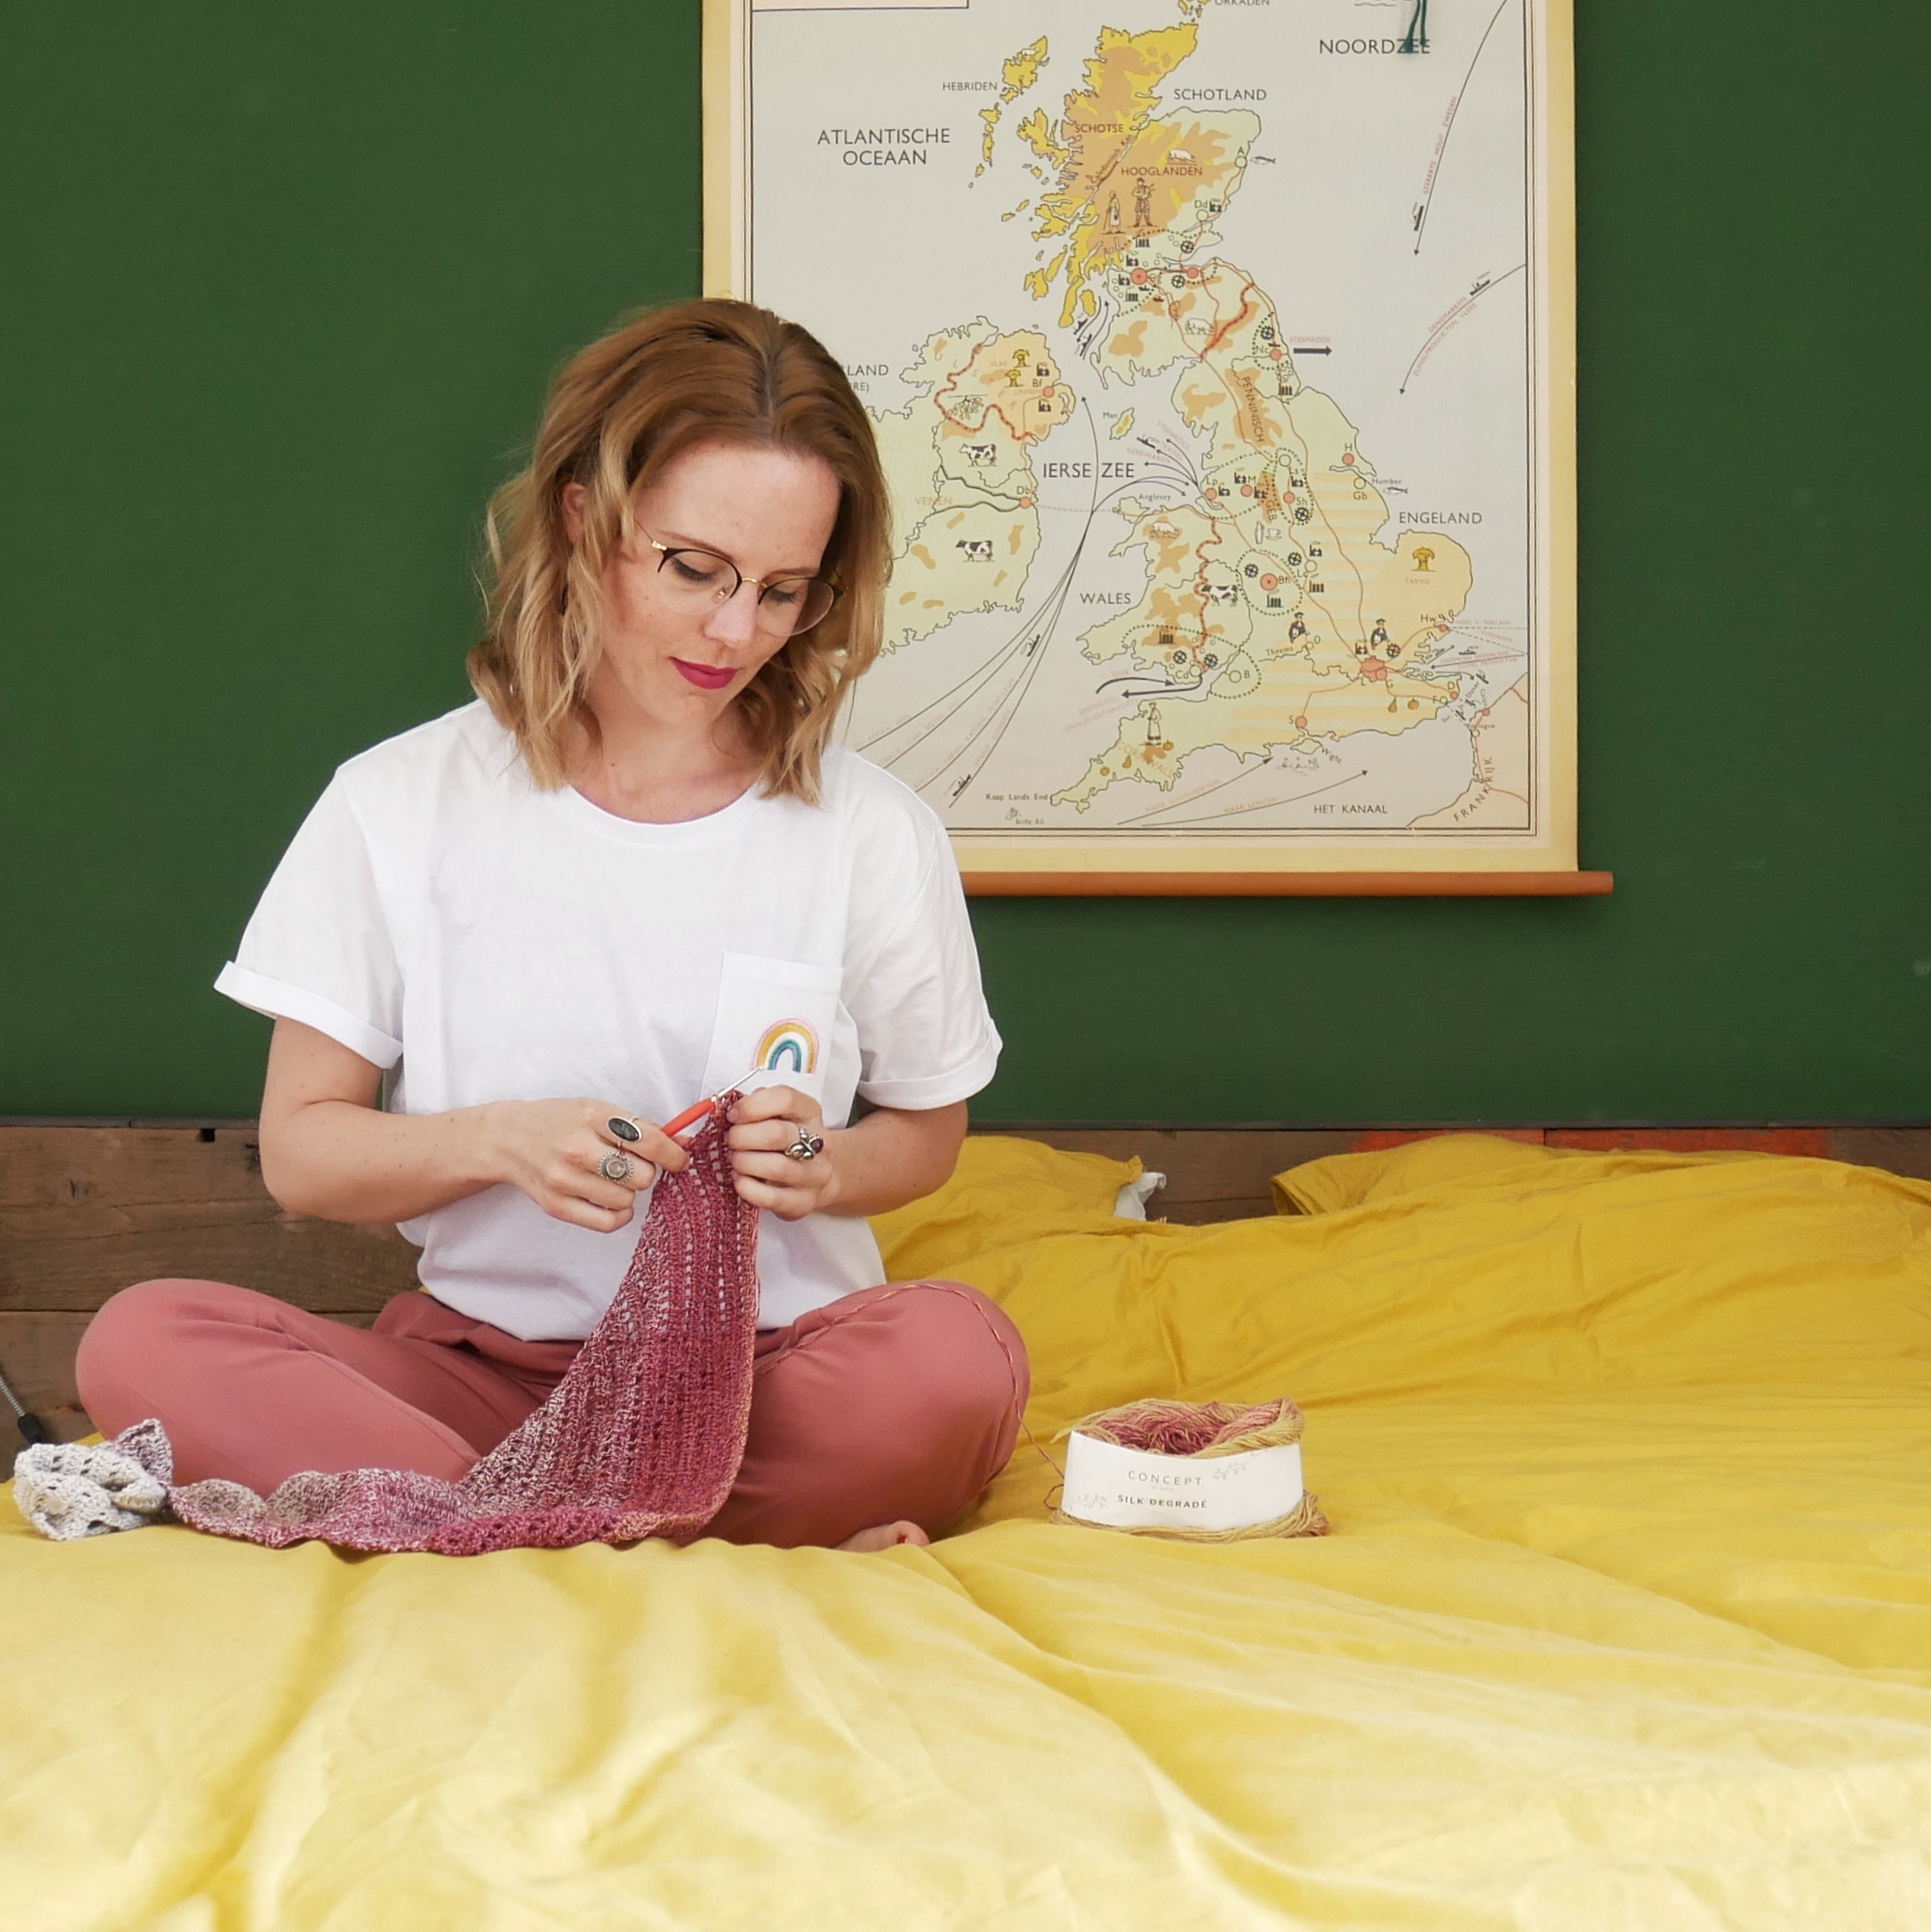
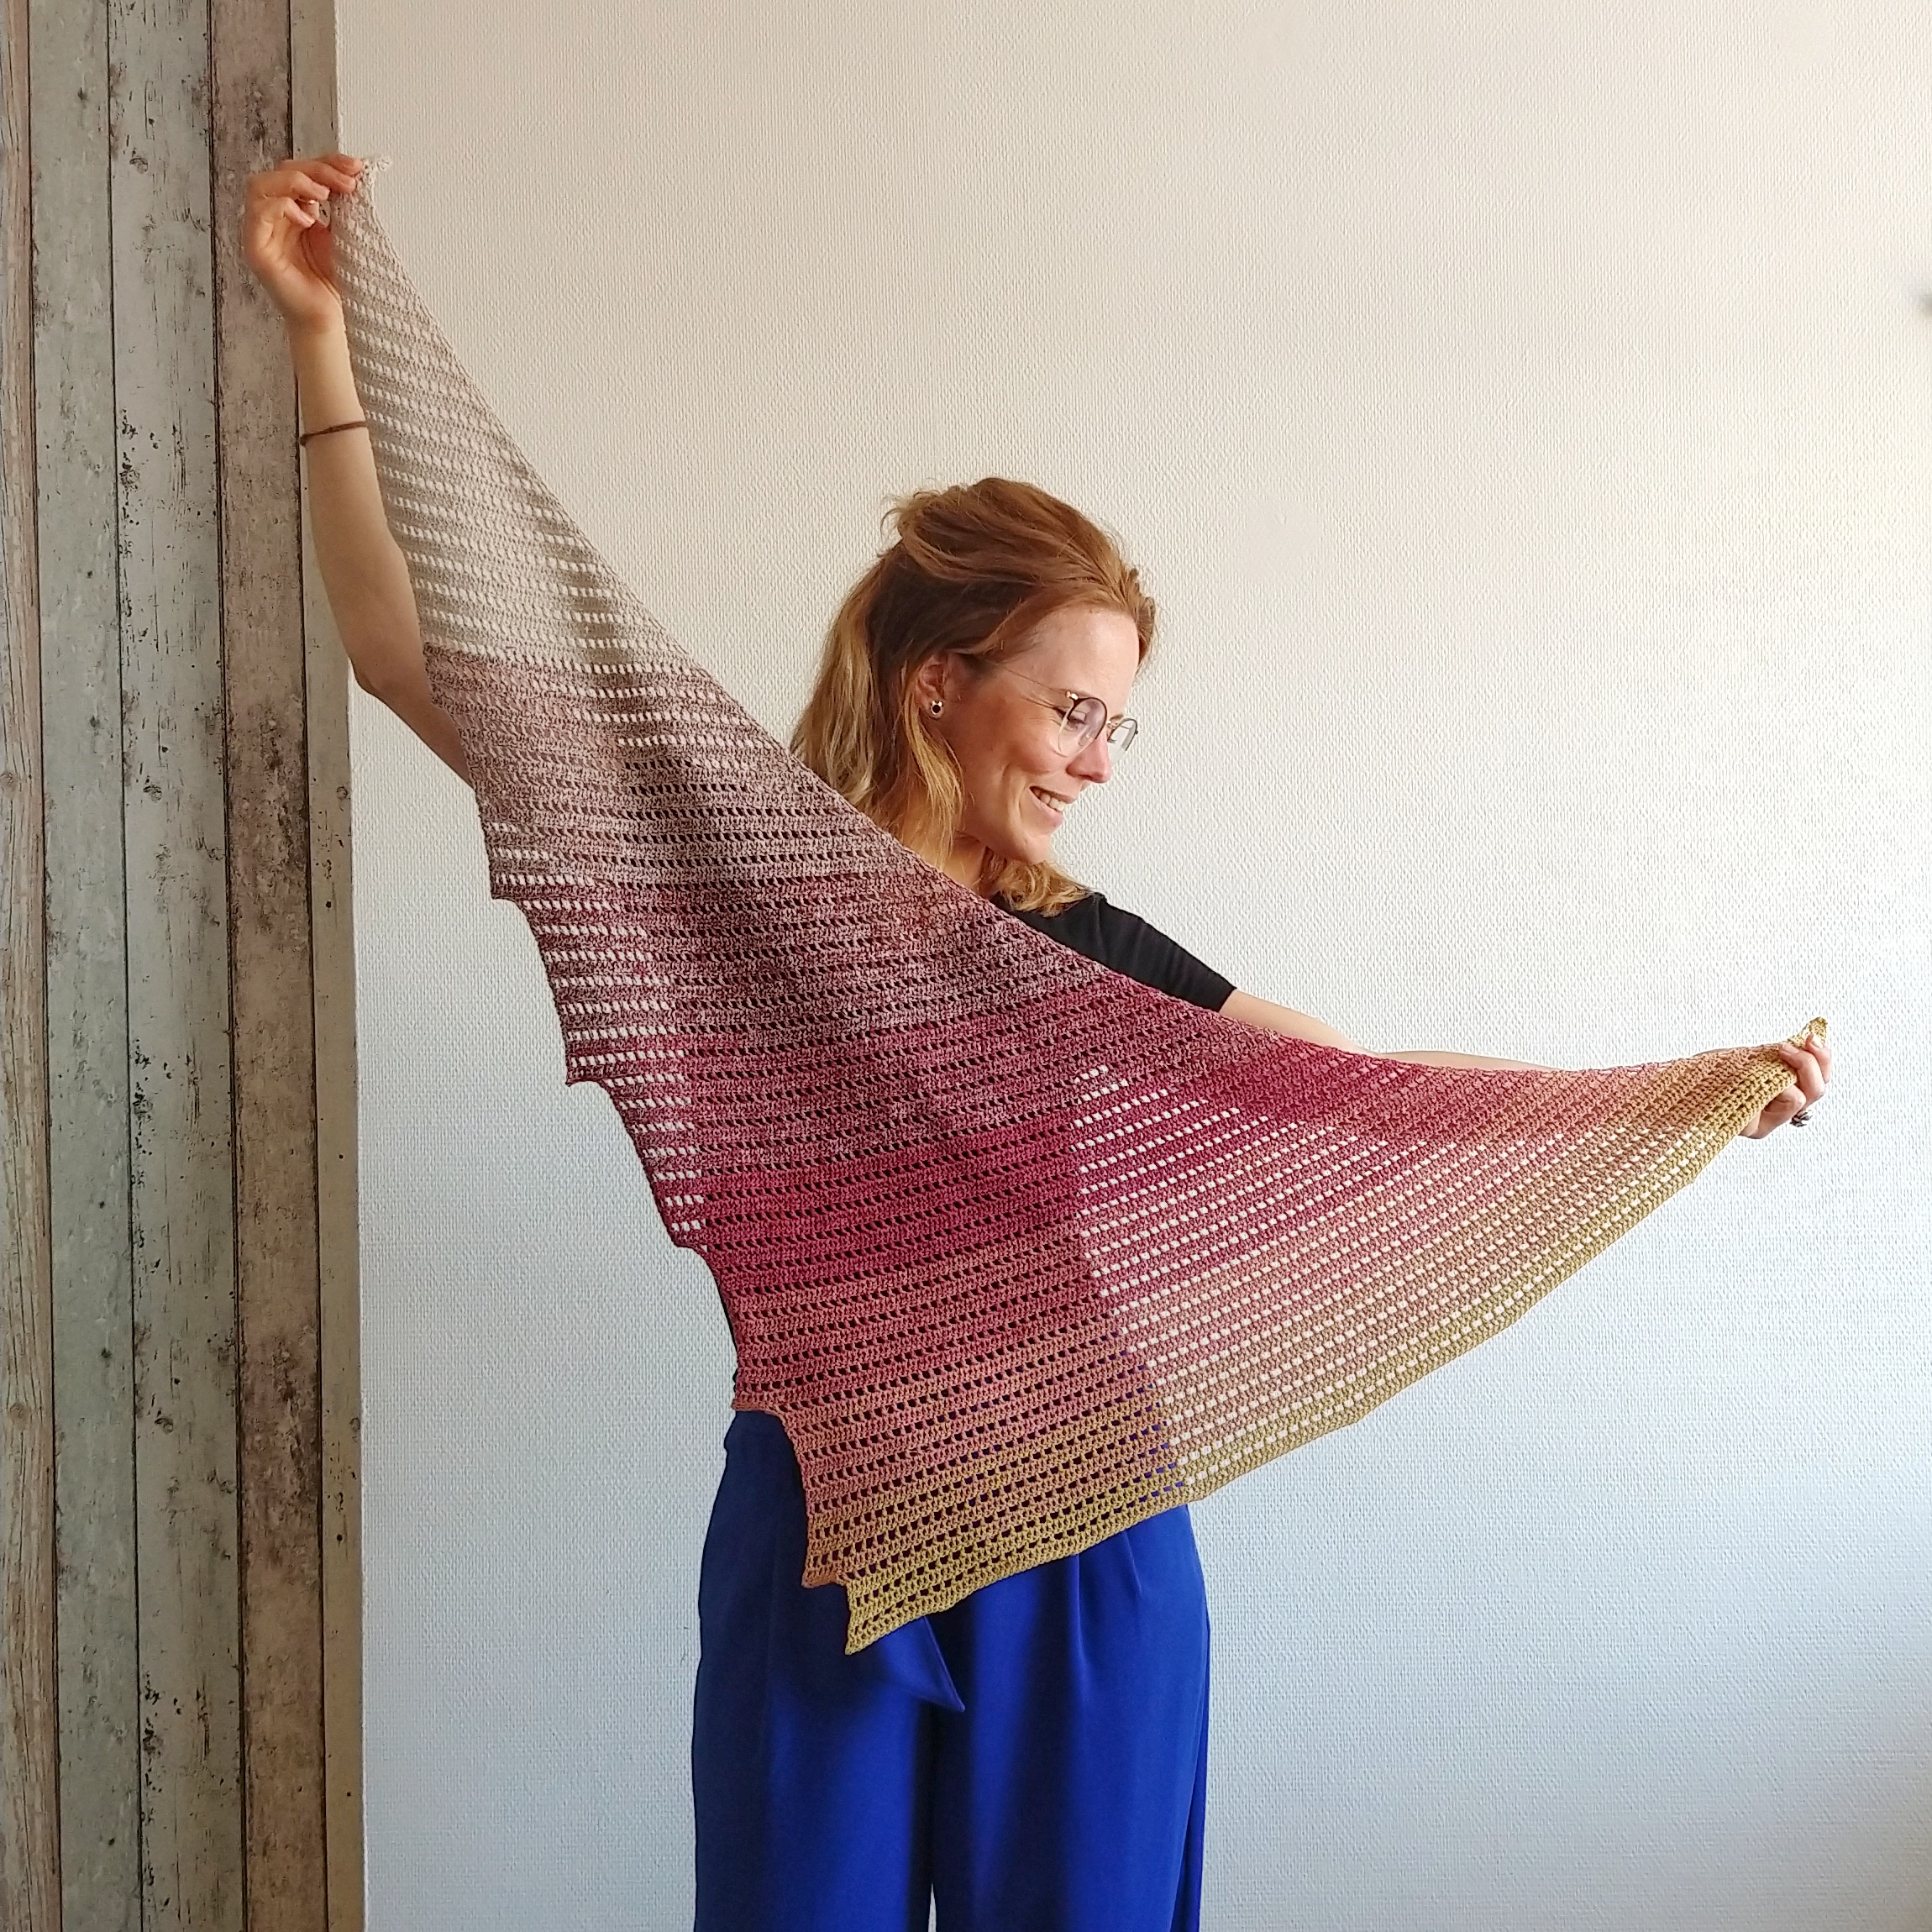
Ik woon in Den Haag, vlakbij het strand en er is niets dat ik fijner vind dan lekker door de duinen en over het strand wandelen of hardlopen. Ik vermijd het liefste de drukte van Scheveningen of Kijkduin, maar ga naar het Zuiderstrand, ook wel het Stille Strand genoemd. Hier is het heerlijk rustig en leeg, met hier en daar een fantastische strandtent. Dit Zuiderstrand mocht wel eens een mooie waardering van mij krijgen. Daarnaast houd ik van alliteratie. Het klinkt zo lekker als Alles Altijd Allitereert. En zo werd 1 en 1 uiteindelijk 2: de Suiderstrand Shawl was geboren!
I live in the seaside city of The Hague (“City of peace and justice”, just so you know 😉 ) and there’s nothing I love more than walking or running in the dunes or on the beach. I never go to the larger, touristy beaches in the area, but always go to the Zuiderstrand (Soutern beach), also known as the quiet beach. It’s wonderfully calm en peaceful, with a few great beach pavilions here and there. I figured it was time to honour this lovely beach in my designs. Add to that my love for alliteration and 1 plus 1 once again turns out to be 2: the Suiderstrand Shawl was born!
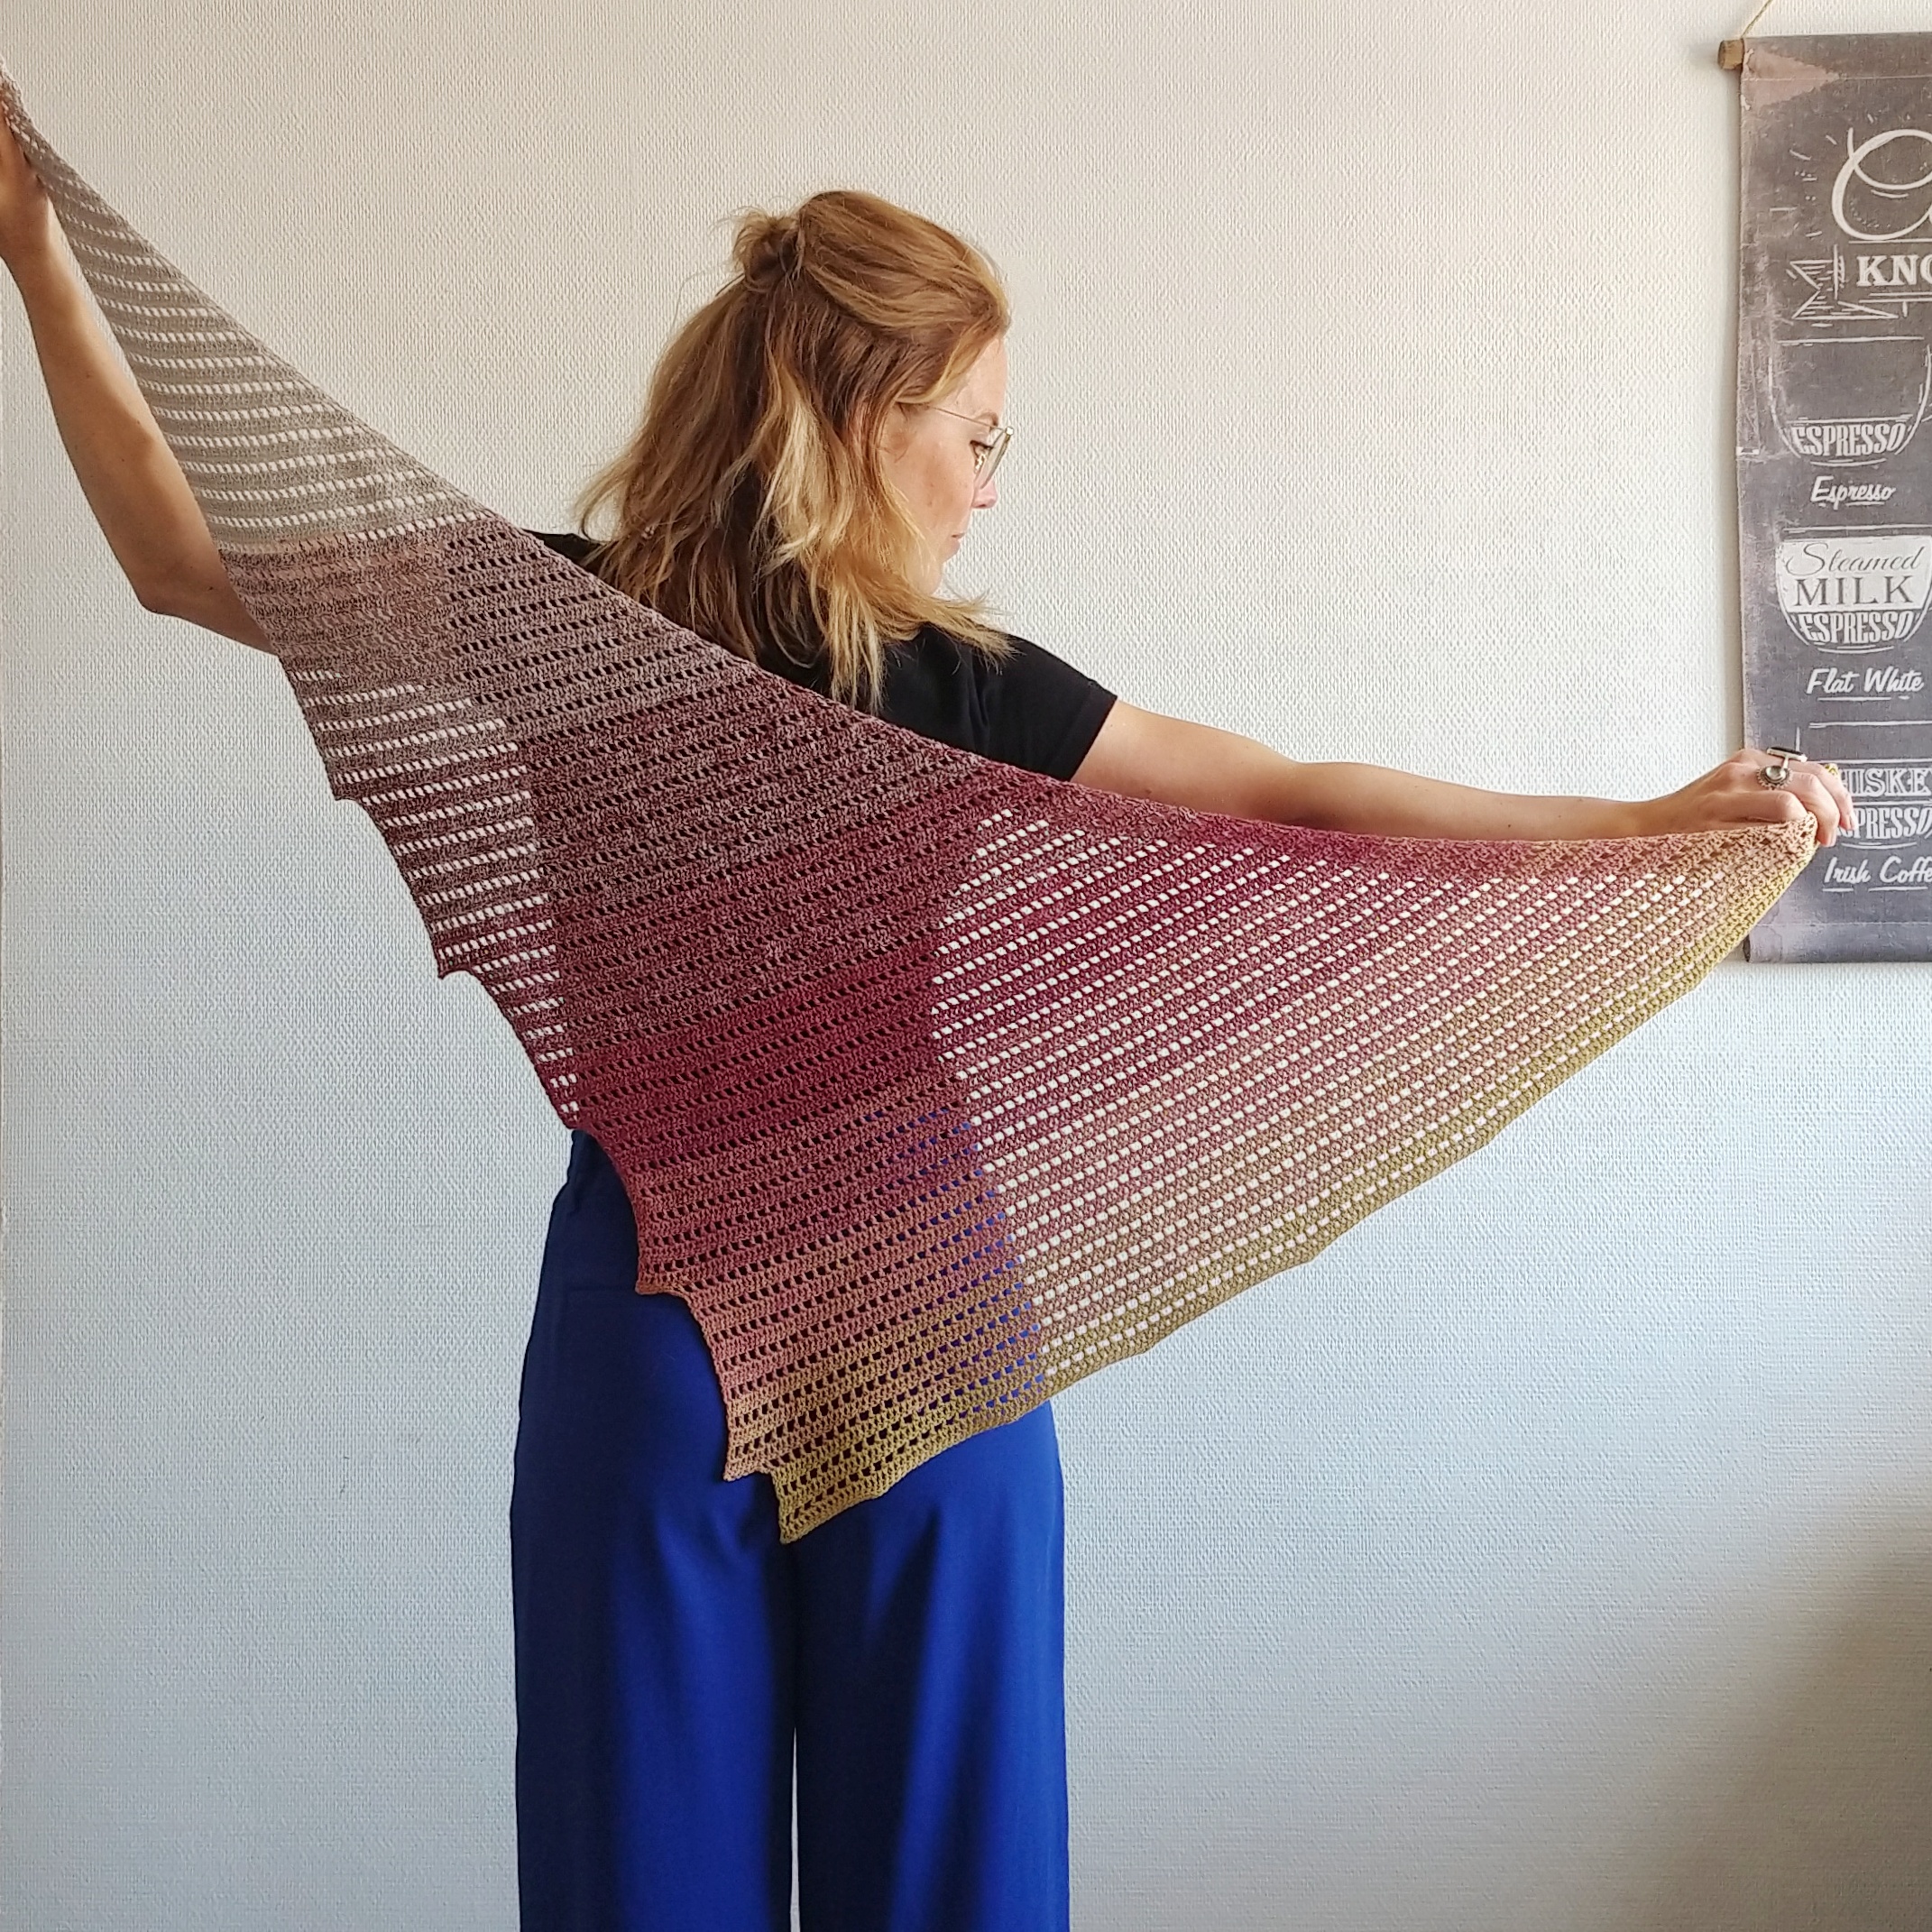
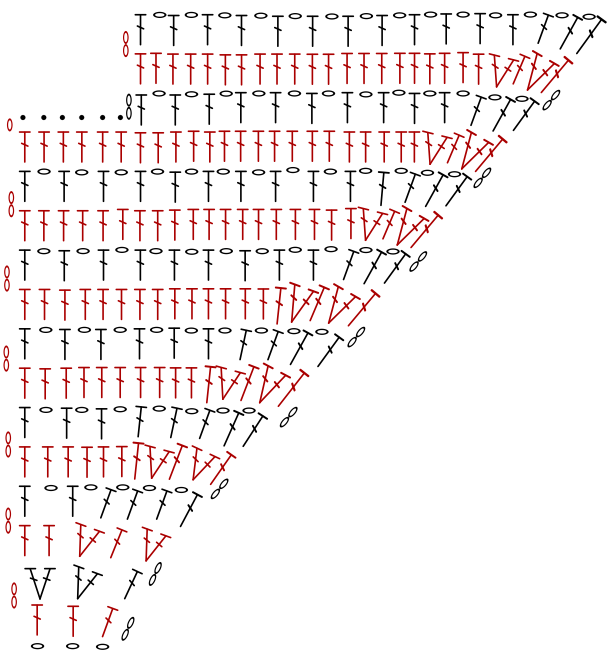
Voor deze sjaal heb je alleen een ‘cake’ nodig van minimaal 600m garen, een bijpassende haaknaald en natuurlijk een schaar en een naald om de losse eindjes in te steken. En dat is het! Het patroon bestaat uit 2 toeren die je steeds afwisselt, met om de 12 toeren een korte verandering, waar het patroon inspringt. Volg het geschreven patroon hieronder of het schema onderaan de pagina.
All the materials you need to make this shawl, are a yarn cake of at least 600m / 656 yards and a matching crochet hook. Of course, keep your scissors and sewing needle at the ready to cut and sew in ends as well. That’s it! This pattern basically consists of 2 repeating rows, with a little change every 12 rows. Follow the written instructions below or the chart at the bottom of the page.


Abreviaciones
· Pto(pts) = punto(puntos)
· Cad = cadeneta
· pe = punto enano
· pb = punto bajo
· pa = punto alto
El Patrón
Heb je mijn patroon gemaakt en foto’s geplaatst op sociale media? Ik vind het superleuk om te zien! Tag mij (@liefsvansuus_ op instagram en Liefs van Suus op Facebook) en gebruik de hashtag #suiderstrandshawl!
Did you make this pattern and post your pics on Social Media? I love seeing those! Be sure to tag me (@liefsvansuus_ on Instagram and Liefs van Suus on Facebook) and use hashtag #suiderstrandshawl!
Ik woon praktisch naast de zee en ik ga dan ook heel graag stukken wandelen of hardlopen door de duinen en over het strand. Ik heb enorm veel respect voor mensen die mooie dingen weten te jutten, want laten we wel wezen; de kans dat je bijzondere vondsten doet op een strand dat zo drukbezocht wordt als dat van Den Haag is natuurlijk klein.
Living very close to the sea, there’s very little I like to do more than to take a walk or a run through the dunes or on the beach. I’m secretly jealous of people who know how to go beachcombing and find the most amazing things, because, let’s be honest; the beach of The Hague is so highly frequented that amazing finds are very hard to come by.
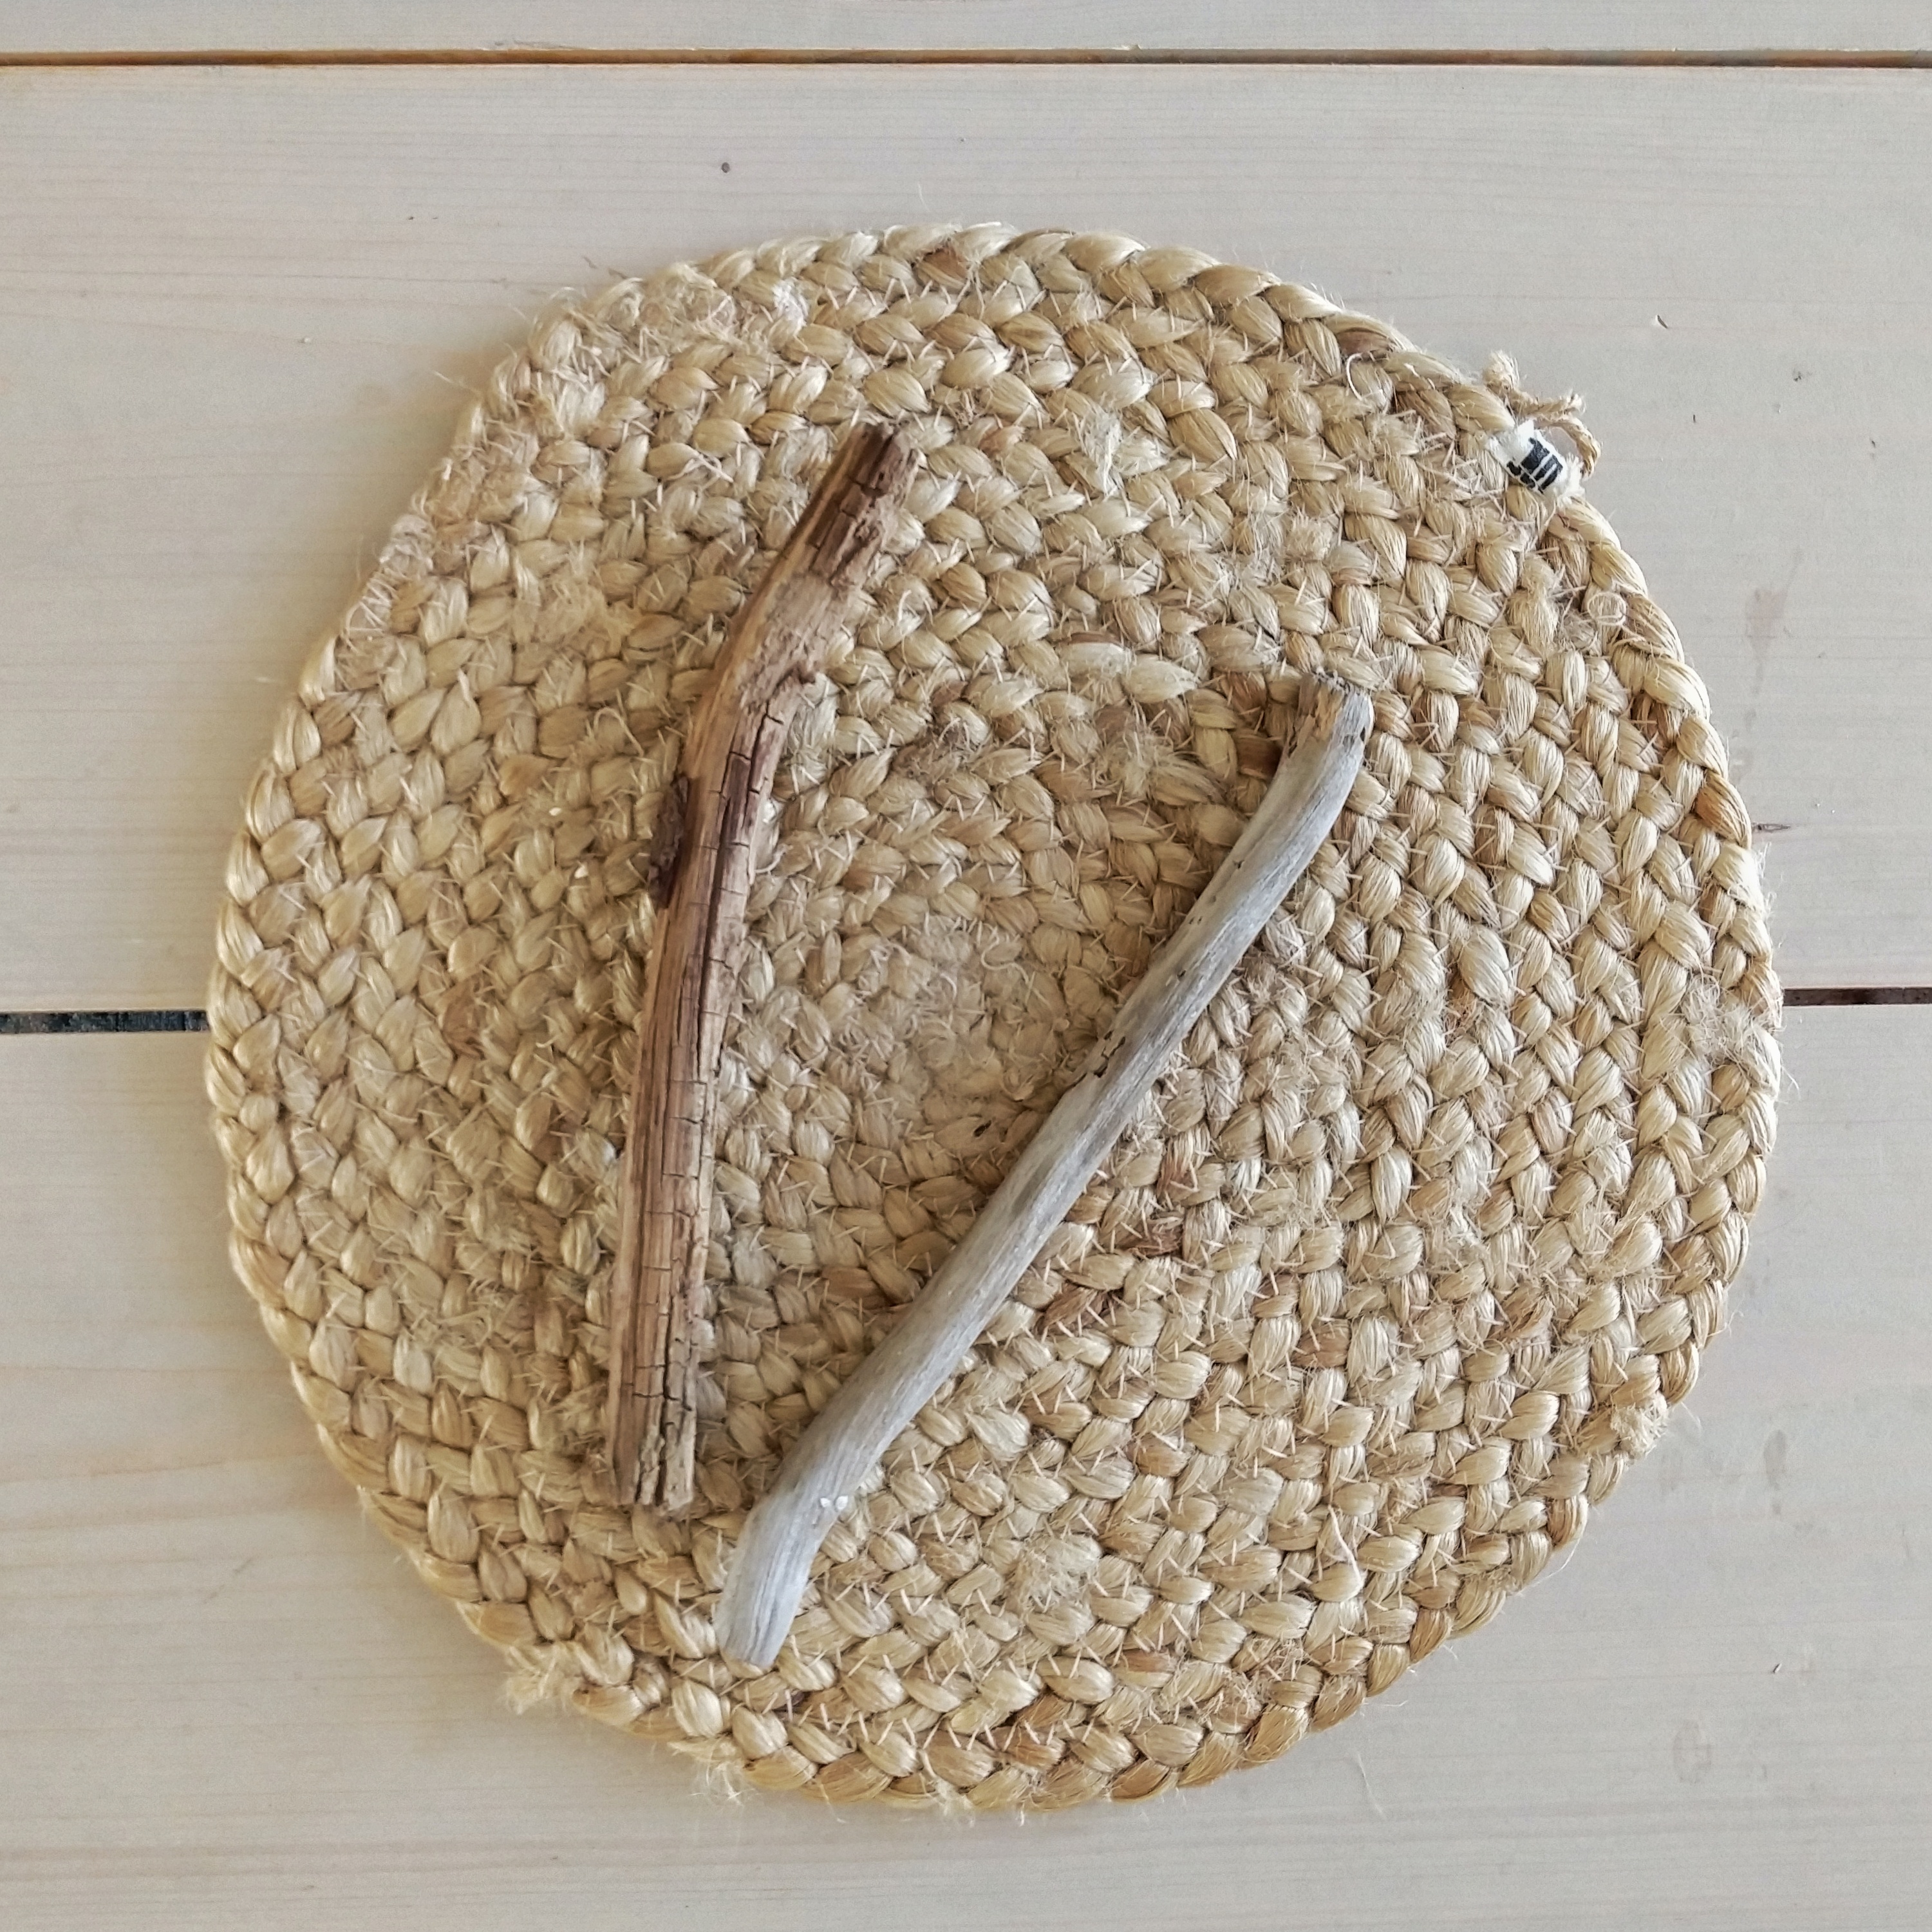
Toch nam ik laatst een aantal mooie, verweerde takjes mee uit de duinen. Ik voelde me net een kind dat met zakken vol schelpen of kastanjes thuis komt na een wandeling. Ik wilde namelijk een leuke muurhanger gaan maken aan zo’n stokje. Gewoon, zomaar. Omdat ik er zin in had. Misschien ken je zulke gekke invallen wel.
Despite not being the most talented beachcomber myself, I did bring back some pretty, weathered sticks from the dunes the other day. I felt like a child with my pockets full of sheashells or chestnuts after a hike. The other day, I had decided to make a wall hanging with a little stick like that. Just a spur of the moment thing really. I suddenly felt like it. You know how that goes.
Had ik kunnen kiezen voor een basic en ingetogen design? Natuurlijk! Heb ik mijn kasten vol liggen met mooie naturelle tinten garen, katoentjes in alle kleuren beige, taupe, grijs of wit die je je in kunt beelden? Absoluut! Werd het dan ook een klassiek en eenvoudig ontwerp? Nou ja… Jullie kennen me inmiddels een beetje.
Could I have made a basic and subdued design? Of course! Is my stash filled with yarn in gorgeous natural tones, cotton based skeins in all the colours beige, taupe, grays and whites imaginable? Absolutely! So did I make a classic and downstated wall hanging? Well… I think you all know me by now.
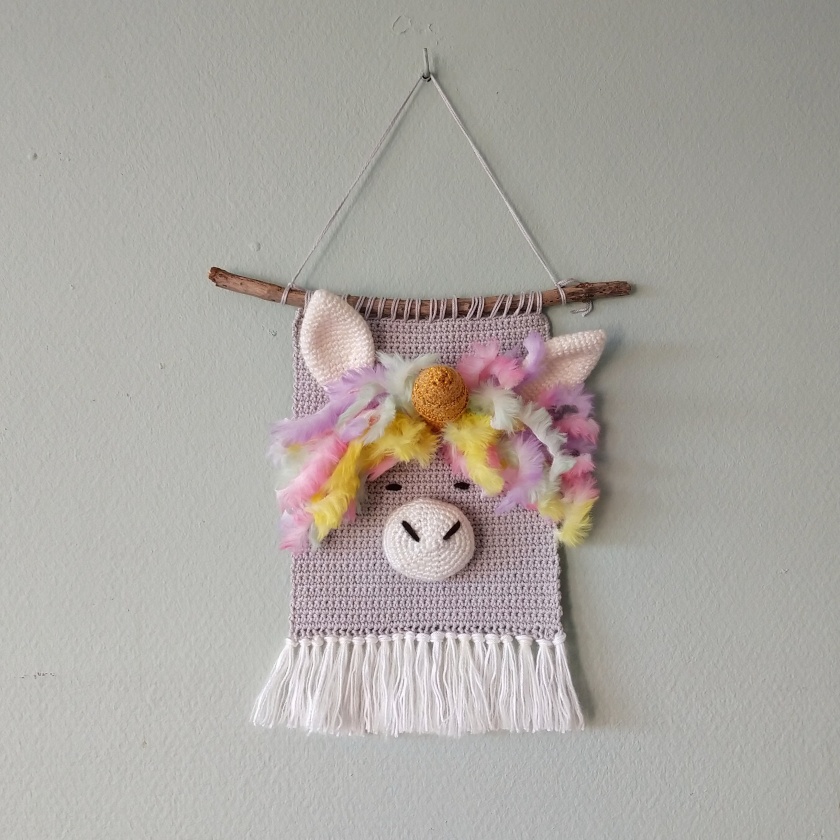
Het kleine barbieprinsesje in mij deed stiekem een sprongetje bij mijn hysterische over-the-top idee: een eenhoorn wandhanger! Ik zou er een gouden hoorn op maken, felgekleurde haren, de hele santenkraam. Natuurlijk kan ik als 32-jarige vrouw zo’n ding niet met goed fatsoen zelf aan de muur hangen in mijn slaapkamer (de wc kom ik misschien mee weg, wat denken jullie?) maar ik en jullie kennen vast een écht klein meisje dat heel erg gelukkig wordt van deze wandhanger. Een perfect cadeautje dus!
The little princess barbie inside of me was dancing around just thinking about my hysterical over-the-top design idea: a unicorn wall hanging! I was thinking of making a golden horn, brightly coloured manes, the whole shabang. Obviously, as a 32-year old woman I can’t really hang this unicorn on my bedside wall (maybe I could get away with the powder room?), but like me, you all probably know an actual small girl who will be over the moon with this wall hanger. A perfect little gift!
Scroll down for the pattern in English

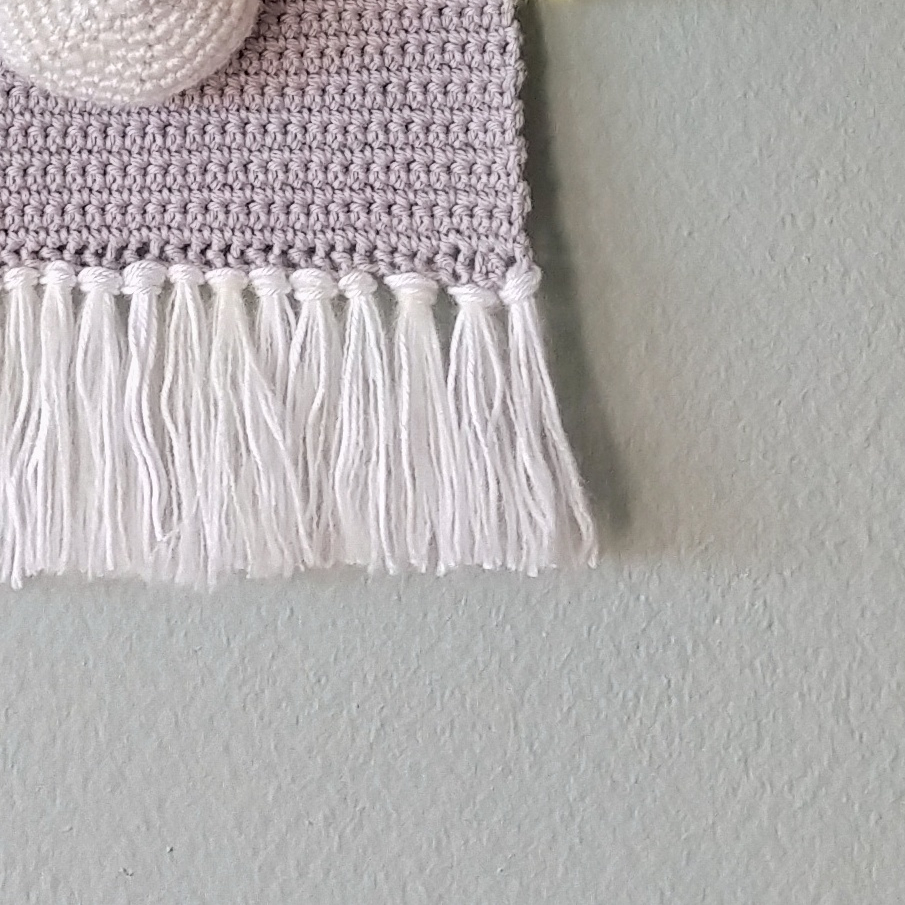
Benodigdheden
– 1 houten stokje
– 1 bolletje katoen voor de basis
– Restjes wit katoen (ik heb er ook nog een beetje mohair aan toegevoegd) voor de neus, oren en klosjes
– Restje zwart garen voor de ogen en neusgaten
– goud glitter garen voor de hoorn (ik gebruikt Durable Glam)
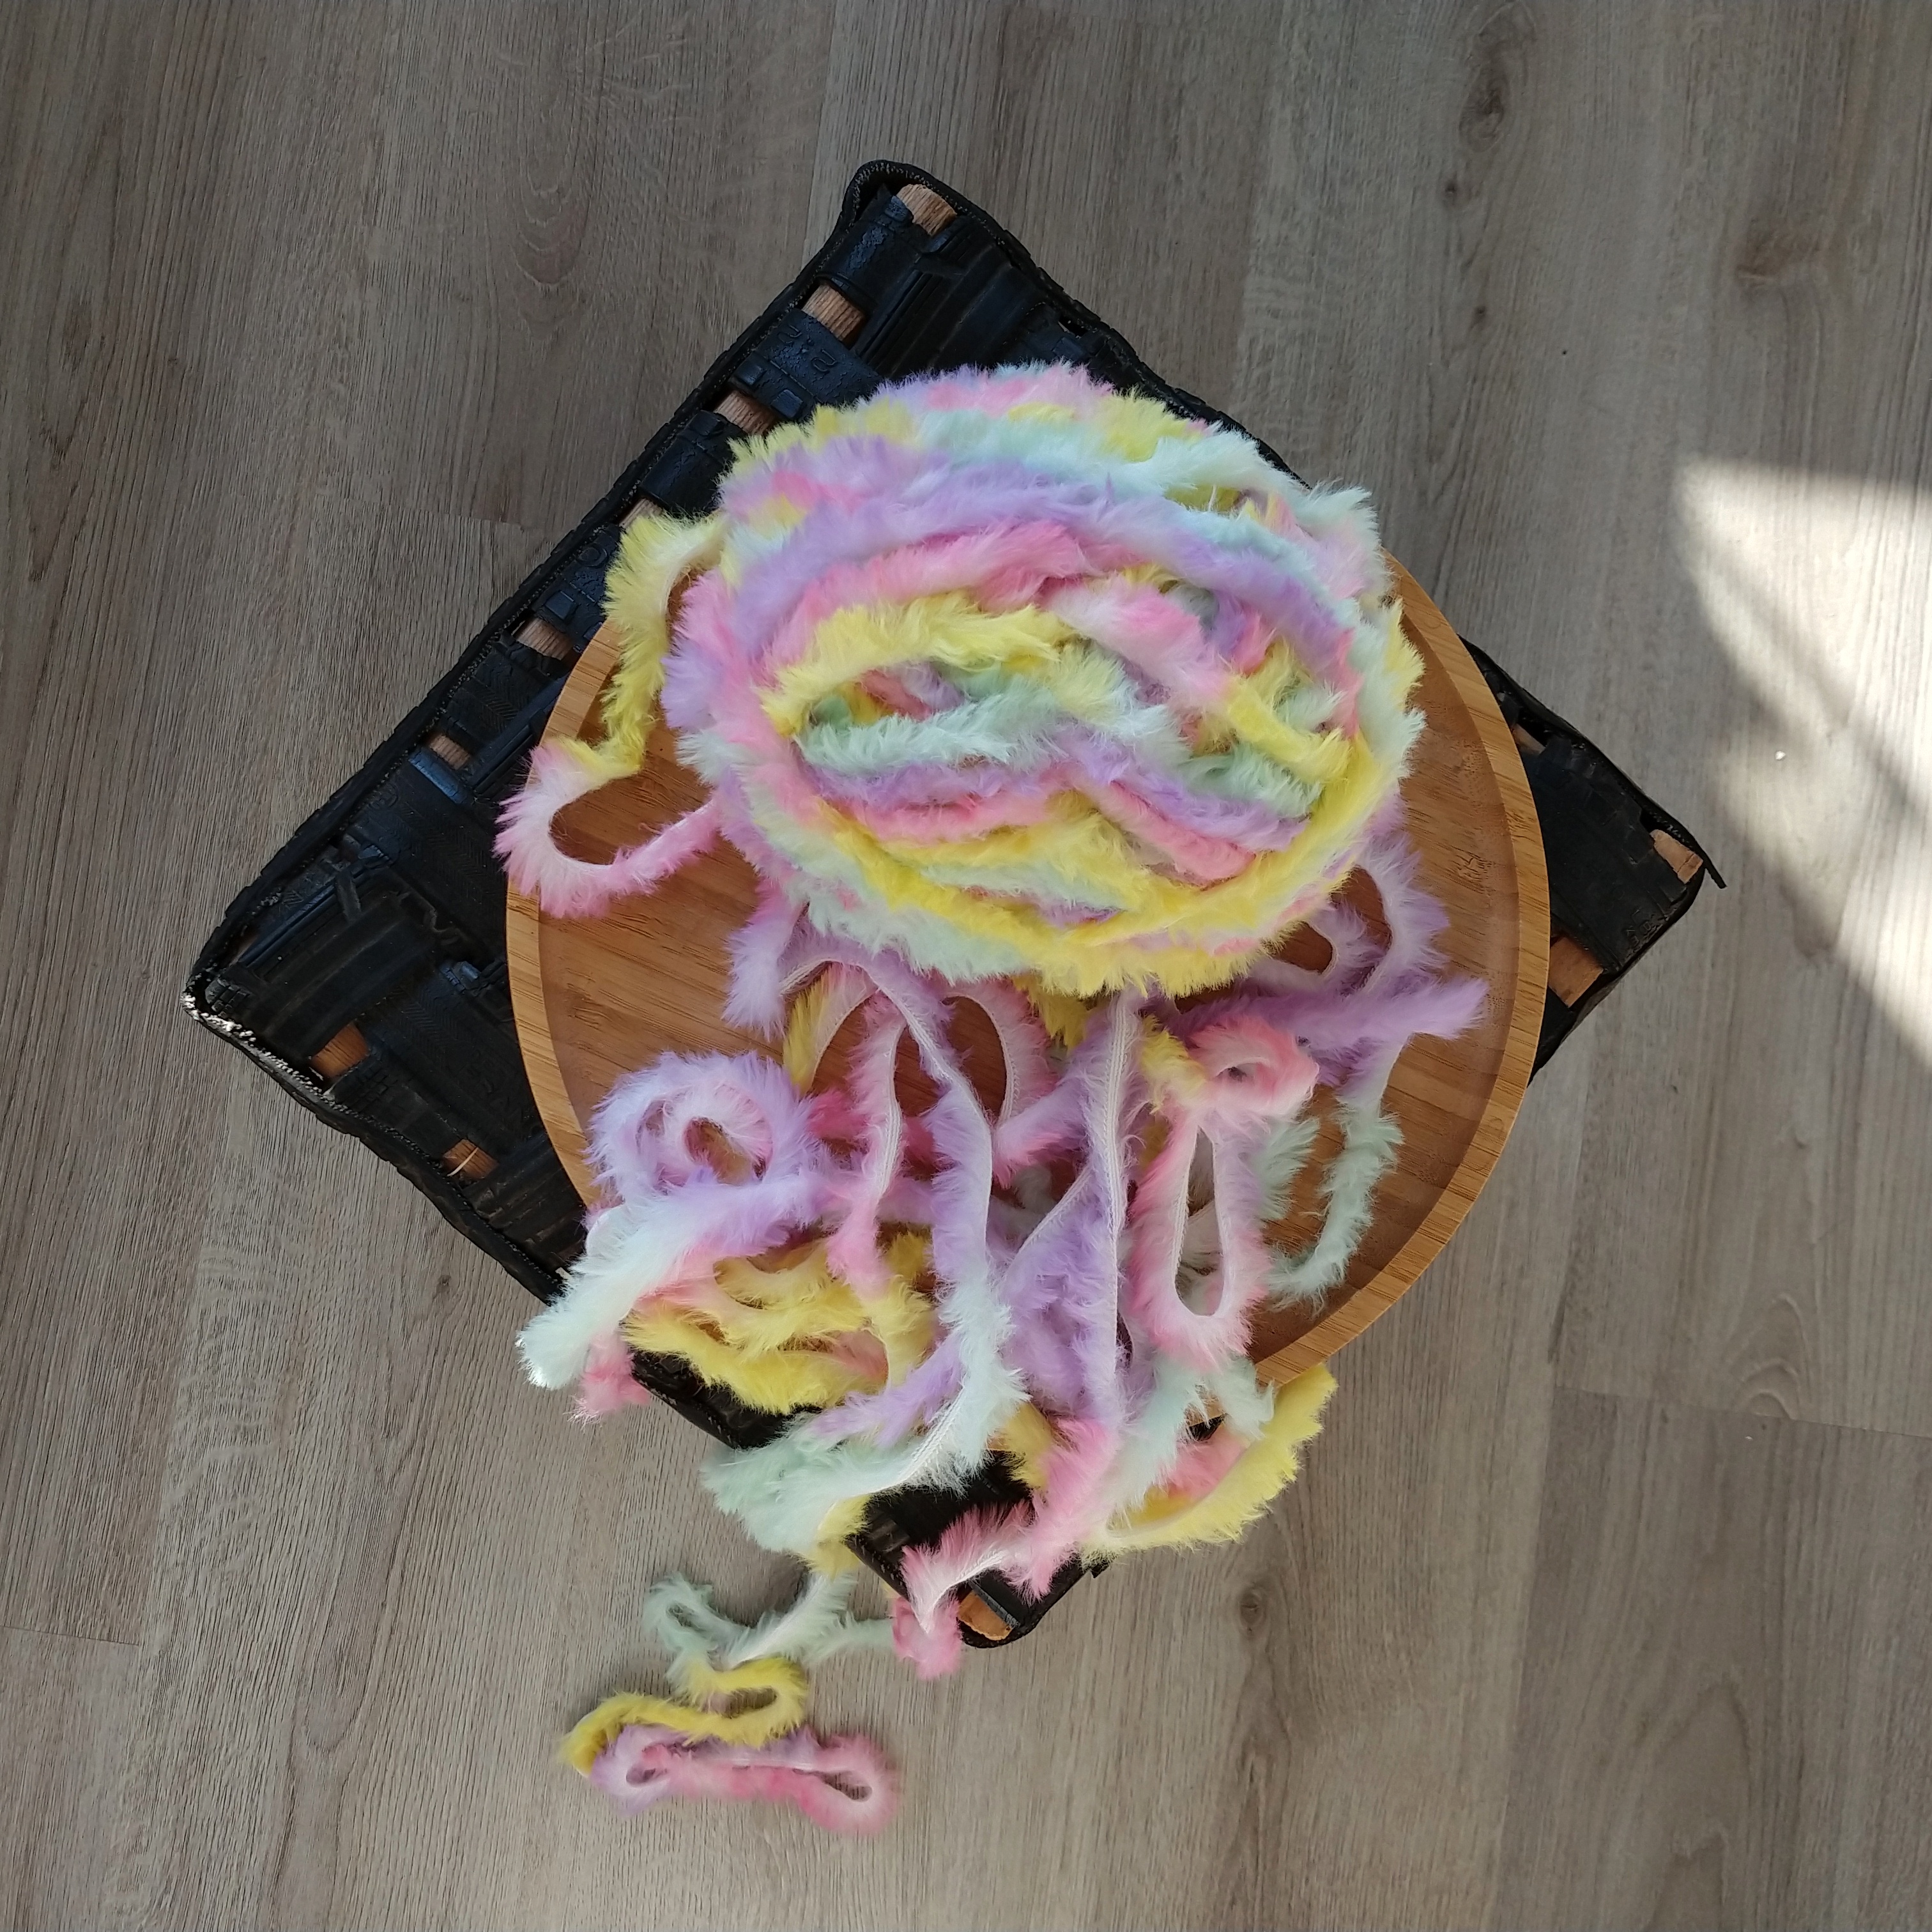
– Bontgekleurd bontgaren voor de haren (ik gebruikte Scheepjes Furry Tales Unicorn)
– Bijbehorende haaknaalden
– Een stopnaald
– Een schaar
– een beetje knuffelvulling
Afkortingen
– st = steek
– l = losse
– hv = halve vaste
– v = vaste
– vvl = vaste in de voorste lus
– val = vaste in de achterste lus
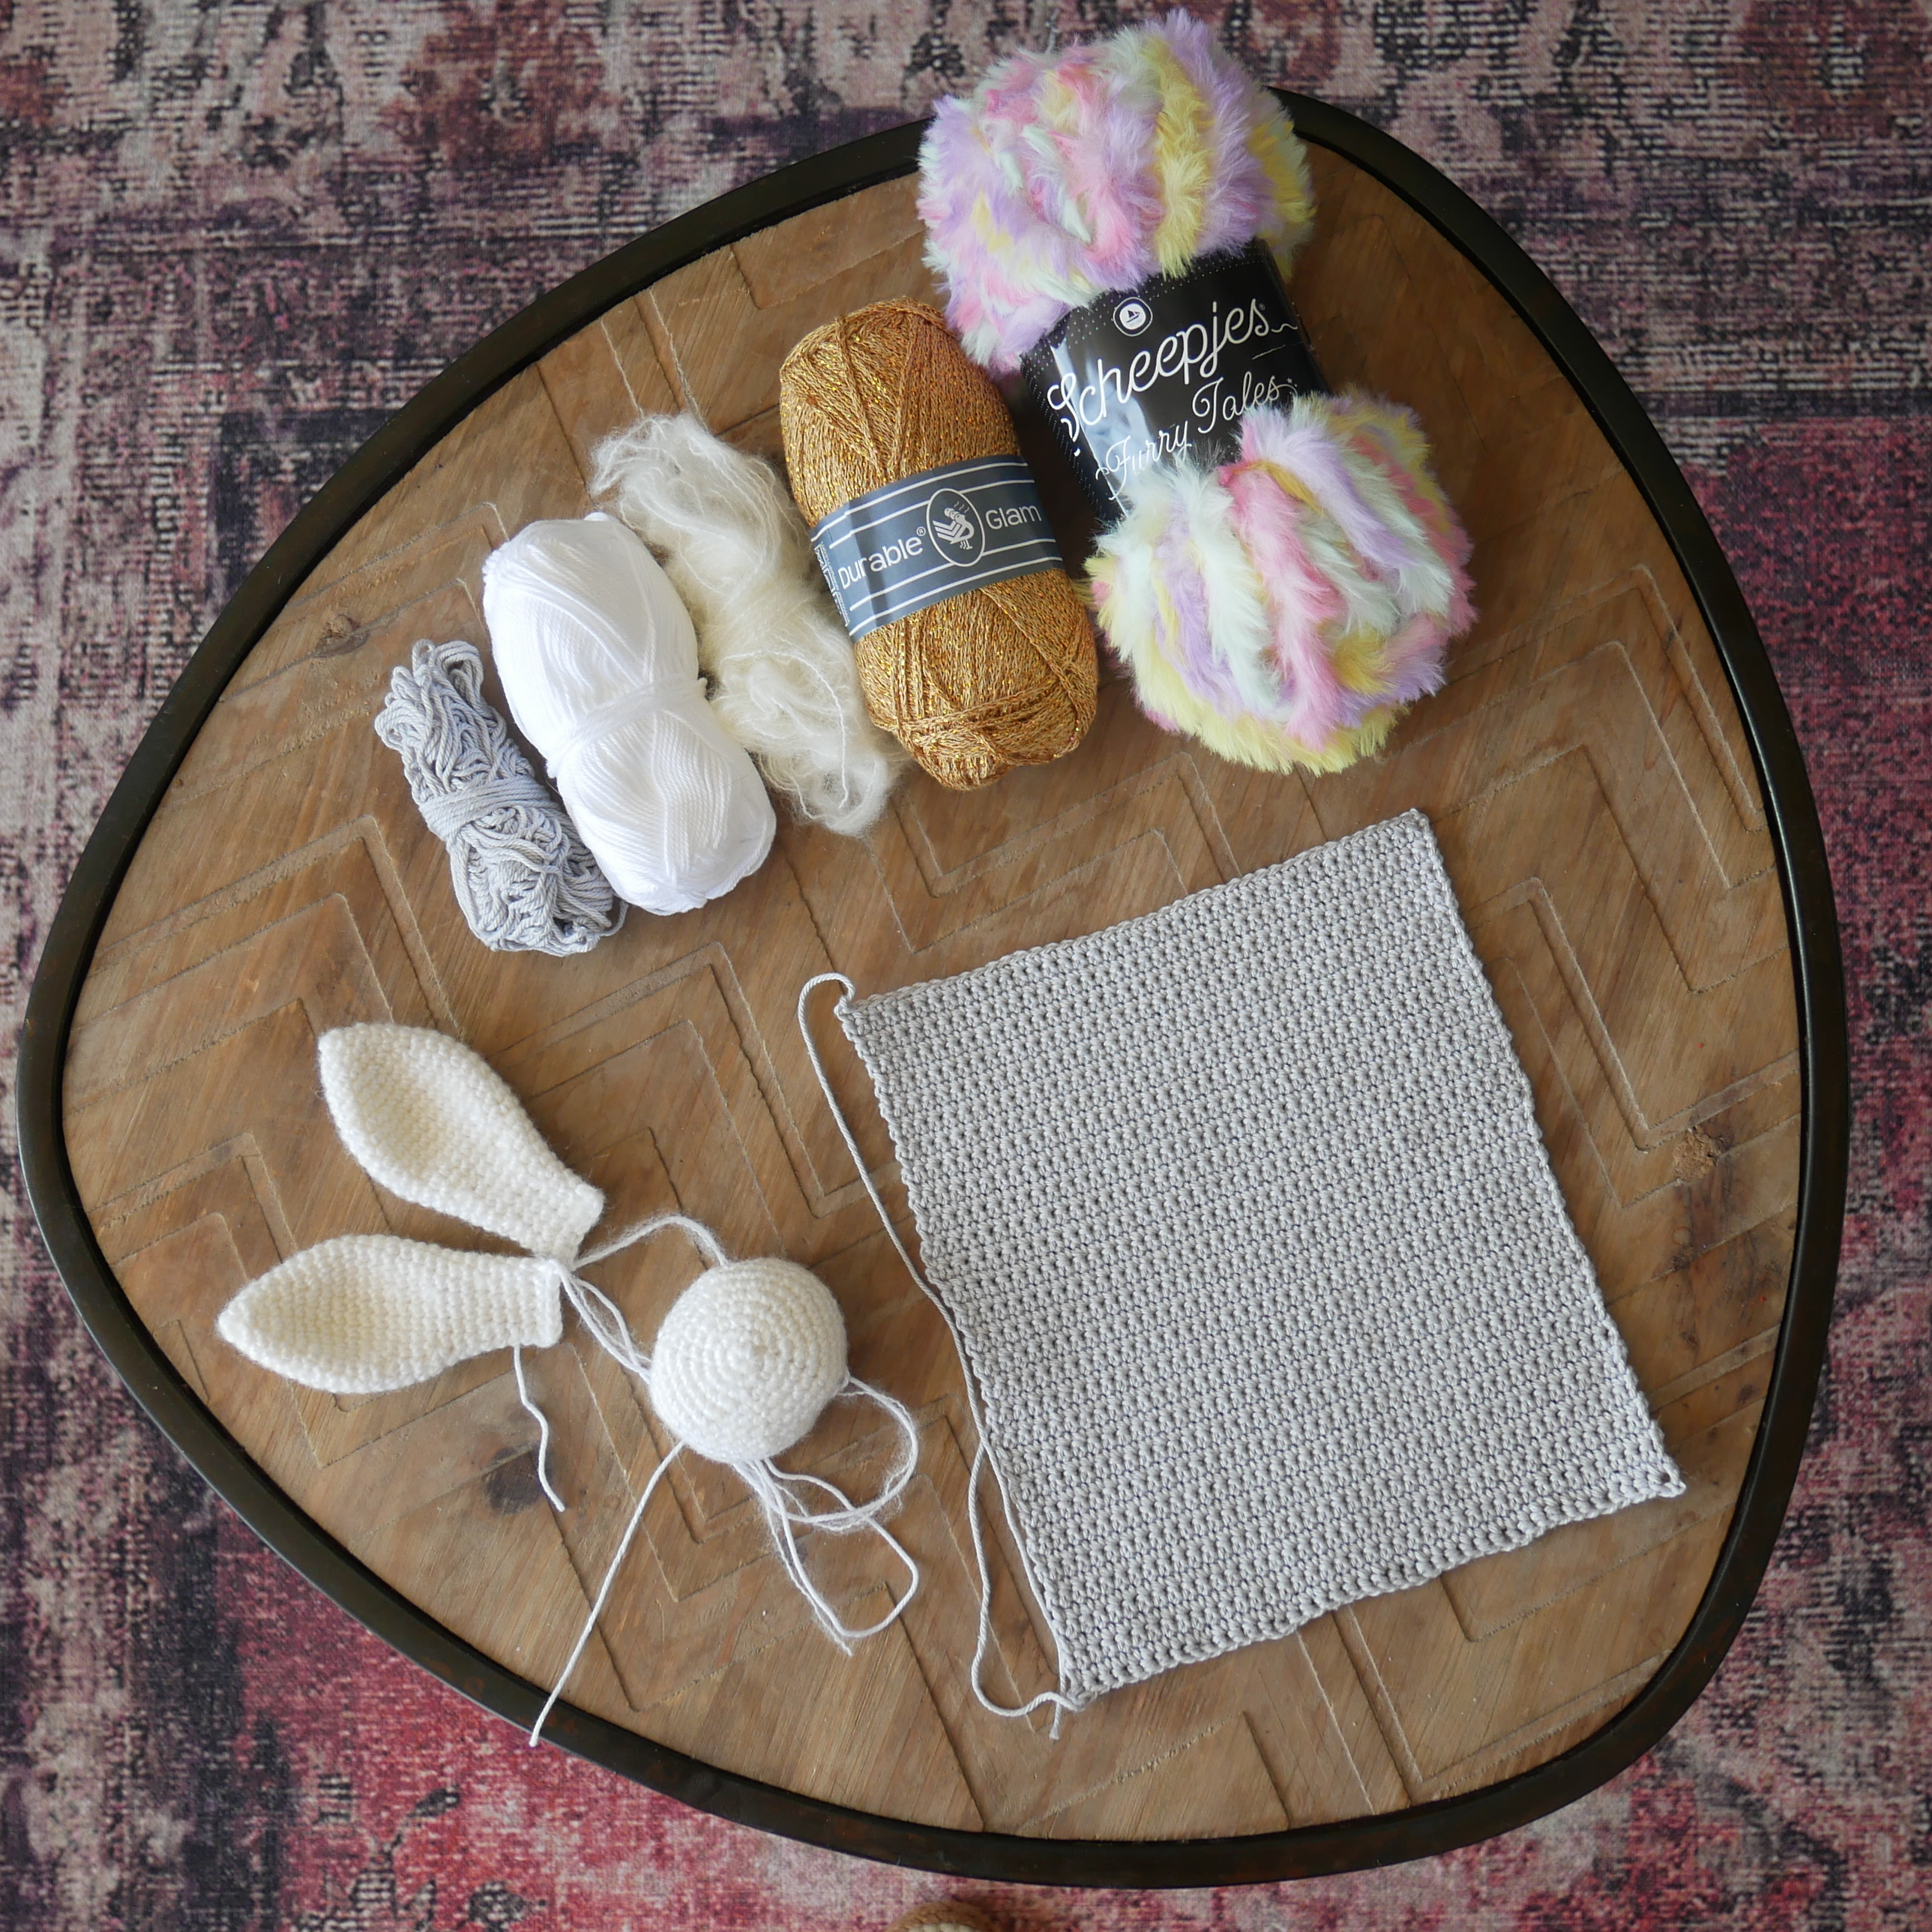
Materials
– 1 wooden stick
– 1 skein of cotton yarn for the base
– Stash yarn of white cotton (I added some mohair too, for extra fluffiness) for the nose, ears and tassles.
– Stash yarn in black for nose and eyes
– Gold glitter yarn for the horn (I used Durable Glam)
– Brightly coloured faux-fur yarn for the mane (I used Scheepjes Furry Tales Unicorn)
– Matching crochet hooks
– Sewing needle
– Scissors
– a bit of stuffing for the horn
Abbreviations
– st = stitch
– ch = chain
– slst = slip stitch
– sc = single crochet
– scflo = single crochet front loops only
– scblo = single crochet back loops only

Ga je aan de slag met Huey en vind het het leuk hem aan mij te laten zien? Tag mij in je Social Media post! (@liefsvansuus_ op Instagram en Liefs van Suus op Facebook) en gebruik de hashtag #hueyunicorn!
Will you be making Huey and would you like to share your results with me? Tag me in your Social Media posts! (@liefsvansuus_ on Instagram and Liefs van Suus on Facebook) and make sure to use hashtag #hueyunicorn!
